

 |
| A Moffat Sunrise. MP23 located in Coal Creek Canyon. Photo by John Shine. |
Subscribe To
Wednesday, February 26, 2020
Wordless Wednesday
Saturday, February 22, 2020
Staging: Montana and Phippsburg
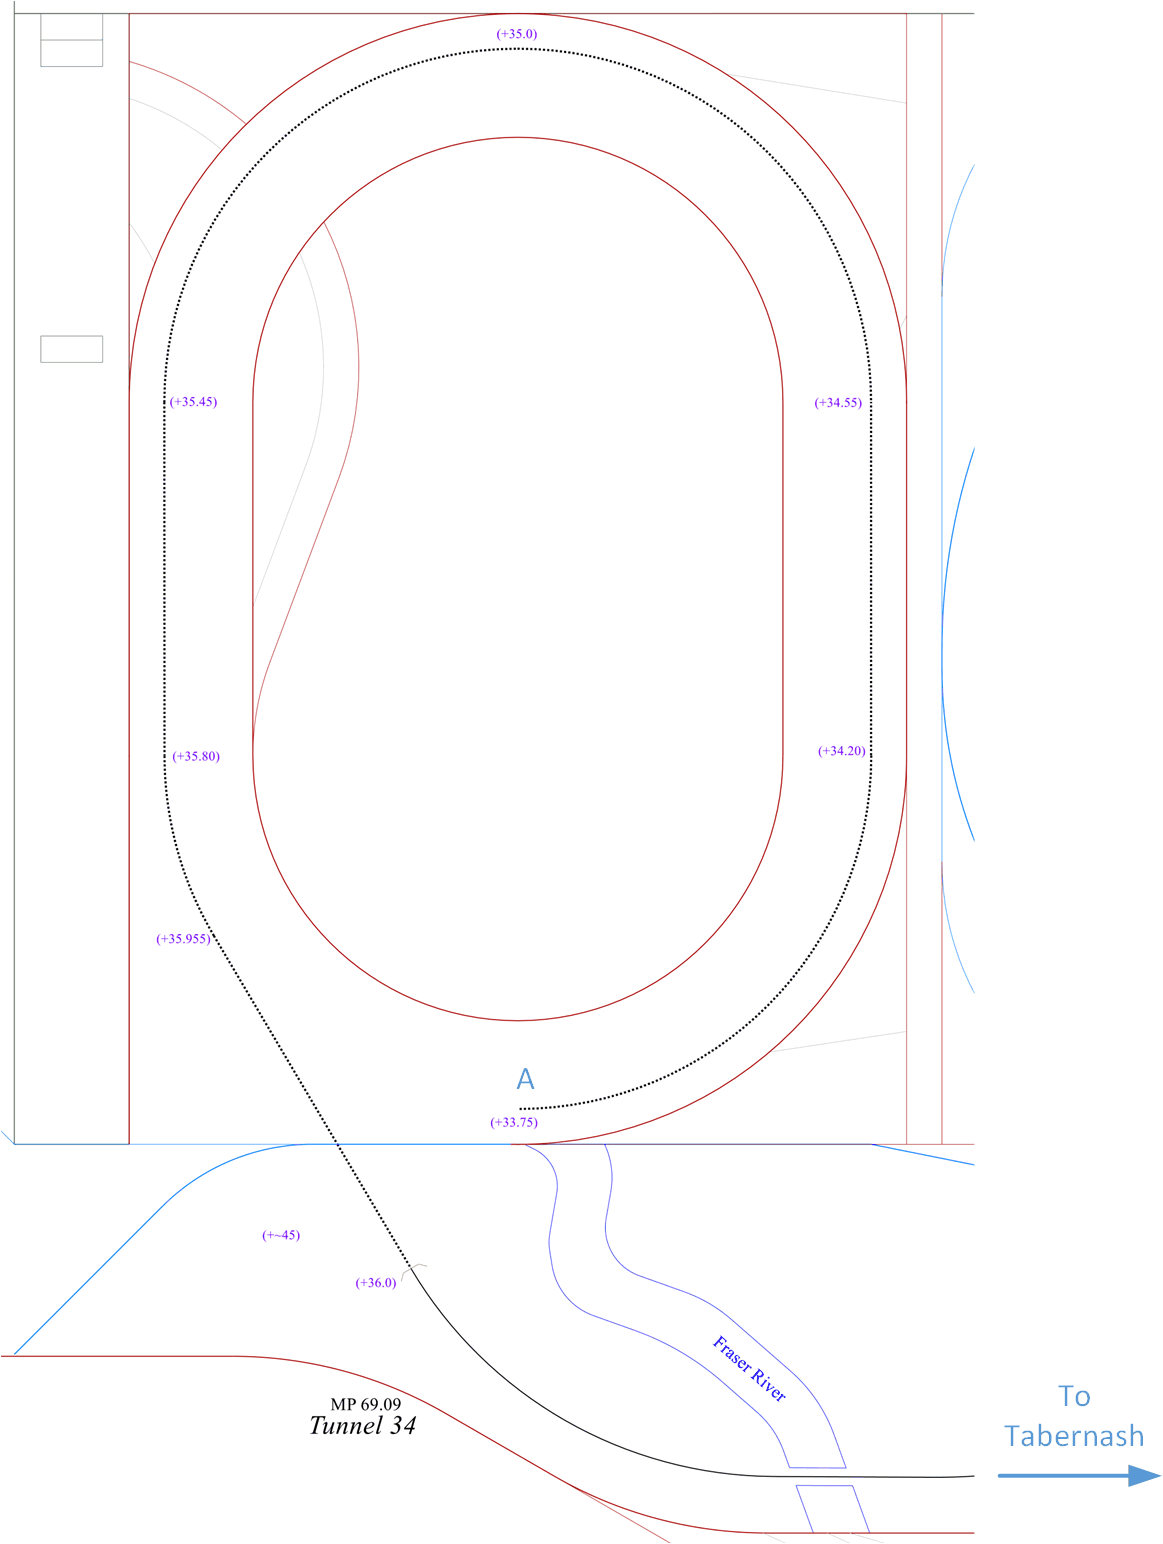
The BNSF line north out of Denver is connected to the main layout via a helix that drops down below the layout just to the layout-west side of Cargill. This line would head north to Cheyenne Wyoming and on to Montana, so I decided to call its staging yard Montana. Some of the traffic off of this line would run through Denver to the Joint Line, so it also needs a connection to the main layout helix. I also wanted to add some additional staging for the Craig Branch (called Phippsburg Staging). The majority of this traffic would be coal loads headed east over the layout and empties heading west. At the time I am modeling, there could be 6 trains each way per day, plus a local freight. That amount of traffic would take up a lot of space in the Granby/Utah yards, making it difficult to stage without some dedicated tracks. This too connects via the main helix. Both of these yards are located below the layout in the garage part of the space.
This will require a penetration of the wall, but it should be workable. The connection point A leads to the Montana Staging Yard, located under the benchwork for the Arvada and C&S Junction part of the layout. The yard is actually two yards, a through yard, and a loop yard. The loop yard can send traffic to either the Joint Line or the BNSF Northern connection.
The two staging yards have a total of 10 tracks. The through yard tracks run between 152" and 175". The loop tracks run between 206" and 233". These tracks can be used to represent the north-south traffic through Denver on the BNSF. I did choose to arrange these yards on the side of the benchwork where there will be an elevated walkway for operators. This allows the other side of the benchwork to be used for storage under the layout - something we need in the house.
The Phippsburg Staging Yard is located under the Barbara Gulch area of the layout. It consists of 6 tracks between 366" and 395" in length, allowing each track to hold two trains. Thus the layout will have enough room for 12 coal trains (6 loaded and 6 empty). The trains would run in a sequence of loads heading up the main helix all the way to Fraser Canyon, running down the layout and for through trains, back into the helix at Prospect Junction headed for the Joint Line. There, the trains would again climb the helix to Utah Staging, take the loop and run back down the helix to Phippsburg Staging. Empties would run in the reverse process. Unfortunately, that does lead to a bit of a long hidden run between Prospect Junction and Phippsburg, but I was not able to avoid it.
Cameron Turner
 |
| Connection to the Montana and Phippsburg Staging Yards. |
 |
| Montana Staging Through Yard with the connection to the BNSF Northern Helix. |
 |
| BNSF Montana Loop Staging Yard. |
 |
| Phippsburg Staging Yard. |
Cameron Turner
Friday, February 21, 2020
Staging: Pueblo, Kansas, UP Wyoming, Utah and Granby
The main line from Tabernash enters the helix and make a loop to drop down to the upper staging yards representing points west. I named the two yards Granby (the next town west) and Utah (the ultimate destination.
 |
| Western Slope Helix Entrance. Point A, connects to the next lower lap of the helix. |
 |
| Granby/Utah Staging Interface with the Helix. Point B continues down several laps to the Pueblo/Kansas staging yards. |
 |
| Granby and Utah Staging Yards. |
Taking a couple more turns of the layout via point B, allows access to additional staging yards.
 |
| Pueblo/Kansas/Wyoming Staging Yard Connections to the Helix. |
 |
| UP Wyoming Staging Yard. |
 |
| Pueblo/Kansas Staging Yards. |
To complete the overview of these staging yards, I also have included the next helix lap down below the Pueblo/Kansas Helix interface. This gives a complete picture of how trains enter/exit the Pueblo/Kansas Staging Yards.
 |
| Lower helix connection to the Pueblo/Kansas Staging Yards. Note the line at D, which connects to the Pueblo Staging Yard. |
I have also mentioned Montana and Phippsburg previously, but I will save those for the next post.
Cameron Turner
Wednesday, February 19, 2020
Wordless Wednesday
 |
| An SP-patch leads an eastbound through Coal Creek Canyon in February 2017. Photo by John Shine. |
Tuesday, February 18, 2020
Deck 3 Overview – The Western Slope
So, it has been a while since I talked about the plan for the dream layout. And there is a reason for that. The morning of the Central Model Train show, we had flooding in the crawlspace accessed in the upper right hand corner of the drawing below. While there was no damage, we identified that the sump pump in the space had failed, and that some of the equipment in the crawlspace is in need of annual maintenance. Surprise!
The previous owner had not told us that the crawlspace items needed annual maintenance and thus regular access. So, it looks like I will need to rework the plans to allow easier access to this opening. Pity, I really liked how this plan had come together and had gone so far as to detail all the buildings, roads, water, and even signals into the layout. But alas, the next iteration will be even better.
In the meantime, I figure I can finish going through the plan as it stands now...or as it stood.
So, here is the western slope as modeled. From Winter Park, the line descends through Fraser and into Tabernash before exiting the layout to through the upper reaches of the Fraser Canyon and entering into the helix. The helix would provide access to staging, and would connect back to the mainline at Prospect Junction - allowing for continuous restaging and continuous running when desired.
Cameron Turner
The previous owner had not told us that the crawlspace items needed annual maintenance and thus regular access. So, it looks like I will need to rework the plans to allow easier access to this opening. Pity, I really liked how this plan had come together and had gone so far as to detail all the buildings, roads, water, and even signals into the layout. But alas, the next iteration will be even better.
In the meantime, I figure I can finish going through the plan as it stands now...or as it stood.
 |
| Deck 3 - Western Slope Plan. |
Cameron Turner
Monday, February 17, 2020
Project Segway - Another Bridge and Another Building
I also said I was working on another bridge for the layout. I decided that I needed something to the left of the station before the tunnel portal, and a bridge seems like a good choice. It also will allow me to add a small stream and waterfall into the layout.
I picked a deck girder bridge for the plan, and found a plan on the internet. I was able to turn this into a 55mm long bridge in T, which makes it 24.75m long (81.2') which is a good size bridge.
I did not plan the bridge far enough ahead of the show to have it on hand for the show, but the bridge arrived from Shapeways on Friday.
The bridge is currently being prepped for priming. I hope to add it to the ModelWorks shope next week after I get it painted.
Along with the bridge, I also got a pair of 3D printed Pattern Makers Pins. These pins can be used to align adjacent train modules. They were used in the MR Canadian Canyons Project layout.
I haven't had a lot of luck ordering them from the same source that MR used - and I haven't found a domestic US source. So, I thought I would make some of my own. They mate with a 0.1mm tolerance (as-built). So, if installed properly, they should make it feasible to align two sections of a layout to a tight tolerance. The design is very close to being ready, but needs a little more work.
I also have one more project coming from Shapeways this week. Fresh off painting all those T houses for the layout, I decided to design one of my own, this one with interior detailing and that could be printed in kit form for easier painting by separating the walls and roof. And if I was going to do the interiors, that also meant separating the walls and floors inside.
I have both a kit version and an assembled version on order from Shapeways. I'm looking forward to seeing the first prototypes, and even maybe having to find a spot for them on the layout.
Cameron Turner
I picked a deck girder bridge for the plan, and found a plan on the internet. I was able to turn this into a 55mm long bridge in T, which makes it 24.75m long (81.2') which is a good size bridge.
 |
| New 55mm Plate Girder Bridge in T-scale. |
I did not plan the bridge far enough ahead of the show to have it on hand for the show, but the bridge arrived from Shapeways on Friday.
 |
| Just arrived from Shapeways. |
Along with the bridge, I also got a pair of 3D printed Pattern Makers Pins. These pins can be used to align adjacent train modules. They were used in the MR Canadian Canyons Project layout.
 |
| Pattern Makers Pins. |
I also have one more project coming from Shapeways this week. Fresh off painting all those T houses for the layout, I decided to design one of my own, this one with interior detailing and that could be printed in kit form for easier painting by separating the walls and roof. And if I was going to do the interiors, that also meant separating the walls and floors inside.
 |
| 950 sq ft T-scale house model. |
Cameron Turner
Sunday, February 16, 2020
Project Segway - T-gauge Highway Part 2
Well, the 2020 Central Train Show has come and gone. The attendance was similar to 2019 (good) and the general word from the vendors was that sales were also good. So, the show was a big success.
We ran almost the whole weekend on a single engine - changing over to a short freight towards the end led by a class 67. I have a video to get edited and posted, so when I do that I will add it to the blog.

The major addition in 2020 was the highway through the module, as seen above. The road is printed in color complete with markings on paper and laminated to first a 0.005" thick piece of styrene. To the center of the road I laminated a 0.010"x0.020" strip of styrene, and then laminated the whole thing to a 0.010" styrene strip that was cut about 1/4" wider to 1/8" wider for sidewalks. The result gave the road a subtle crown effect. Maybe too subtle , but I know it is there.
Where the sidewalks were, I laminated another piece of 0.010" styrene as a sidewalk - prepainted in a concrete color and scribed with expansion joints. A little bit of chalk weathering, and the whole things was done and I laminated it onto the layout.
Up to this point, I had followed the steps used in MR on the Canadian Canyons Layout to model Canada Highway 1. Here I messed up. I should have sprayed the road with dullcoat to seal it before mounting. I didn't. I also should have done a better job of smoothing the surface before mounting the road. As a result, I will have to do some rework on the road to eliminate a few bumps, and to fill a few extreme dips that the road and surface exposed. In T, these are all too easy to create. I do expect to be able to spray the road with dullcoat after I am done so that the scenery nearby does not ruin the road.
I will also need to adjust the pedestrian bridge. It is about an eight of an inch too far to the right in the photo above. After that, the buildings need chimneys, doors and window painted. Then, I will need to add a few driveways and little bit of road by the station and the garden houses at track level.
Cameron Turner
Wednesday, February 12, 2020

Sunday, February 9, 2020
Project Segway - Central Model Train Show Day 2
Well Day 2 is in the books and the 2020 Central Model Train Show is over. The Central T-gauge Layout received numerous compliments, and a lot of stares in amazement.
I remembered to get a good shot of the bridge with the mirror I added. The effect is pretty good, and will be better once the backdrop supports it better.
We figure we ran about 1500 scale miles (m,ore than 3 real miles) during the show with very few problems. Most of that was with one engine. However, I did get out my Class 67, along with a couple of coal cars to pull a freight late in the day. I need to get some more coal cars. once I added the weights to the cars, the train ran well.
I have some thoughts about relocating a few buildings, and I have one more bridge to add to the line to the left of the water tank in the view above. This will also mean that I will cut into the cliff here and add a waterfall. Waterfalls always draw attention. There are a few bits of road that will need some work, and some sculptamold is needed by the bridges. However, it was a good show for the layout. I plan to upload a new video in a few days too.
I also have another T-gauge building project completed - and if it comes out okay from Shapeways, I hope to have a new addition to the layout - or to the next layout. We will see. I have anumber of things to work on for next year, including further work on the town, adding driveways, mounting the buildings in their final positions, the station platform, the new bridge, a bit of scultamold work, ground cover, water, trees, bushes, etc, and vehicles. Lots to do, and other projects on my mind as well.
Cameron Turner
 |
| The new bridge with the mirror. |
We figure we ran about 1500 scale miles (m,ore than 3 real miles) during the show with very few problems. Most of that was with one engine. However, I did get out my Class 67, along with a couple of coal cars to pull a freight late in the day. I need to get some more coal cars. once I added the weights to the cars, the train ran well.
 |
| The short little freight goes by the station. |
I also have another T-gauge building project completed - and if it comes out okay from Shapeways, I hope to have a new addition to the layout - or to the next layout. We will see. I have anumber of things to work on for next year, including further work on the town, adding driveways, mounting the buildings in their final positions, the station platform, the new bridge, a bit of scultamold work, ground cover, water, trees, bushes, etc, and vehicles. Lots to do, and other projects on my mind as well.
Cameron Turner
Saturday, February 8, 2020
Project Segway - Central Model Train Show Day 1
Day 1 is in the books. It was an adventure getting to the show yesterday morning - more on that next week - but the layout made its appearance.
The painted buildings make a big difference, and the road and adjoining sidewalks are in place. The layout ran fairly well, with periodic cleanings necessary. Many folks were impressed with the layout and the fact that it is in something even smaller than Z-scale.
If you are in the upstate tomorrow - come by Easley between 10AM and 5PM. There are lots of vendors, layouts and of course - the mini T-gauge layout to see.
Cameron Turner
 |
| Central T-Gauge Layout 2020. |
If you are in the upstate tomorrow - come by Easley between 10AM and 5PM. There are lots of vendors, layouts and of course - the mini T-gauge layout to see.
Cameron Turner
Friday, February 7, 2020
Project Segway - A T-gauge Highway
The second major project for this year's show is the completion of the main road. The road defines the village in the layout, and needs to be installed so that I can install a major pedestrian bridge.
It turned out to be a major bit ow work to figure out a road shape that worked, but with a lot of trial and error, I came up with one.
Once I had a general shape that worked, I had to turn it into a CAD drawing. And then I had to turn that drawing into artwork that could be printed. All this took a number of iterations for shape, line patterns, line weight and color. And then, there is the double and triple checks that it fits as drawn. But here is the result.
There is a little bit more to do with some of the traffic control lines needing to be added. However, with the template correct, it is time to cut the underlayment. Directly under the paper road surface will be a 0.005" thick piece of styrene. I plan to cut another thin 0.005" strip to run down the middle of the road to provide a slight crown to the road. Under this, will be a 0.010" piece of styrene that will support the road and the sidewalks (drawn in purple above). Some of the sidewalks are 10 scale feet wide, others are 5 scale feet wide. The sidewalks will be cut from additional pieces of 0.015" styrene representing. When placed along side the road, there will be about a 0.010" sidewalk height (4.5 scale inches). This is small, but I hope it will be noticeable.
Cameron Turner
It turned out to be a major bit ow work to figure out a road shape that worked, but with a lot of trial and error, I came up with one.
 |
| Road Template. |
 |
| Road Artwork. |
 |
| Cutting the styrene templates. On the right is the paper template, on the left is the 0.005" styrene foundation. |
This is a project in progress as of this writing, but we will see if I can have it installed in time for the show. I'll finish describing my installation process in the next post on the highway construction after the show.
Cameron Turner
Thursday, February 6, 2020
Project Segway - Buildings for the Central T-Layout
Post have been sporadic recently, as January was a hard month. My wife's best friend saw her sister pass away due to pancreatic cancer. Then a student I taught died of colon cancer. And on Friday night a friend of ours died after being a car accident. It has been a traumatic few weeks that leaves you thinking about how little time we have in this life and how quickly it may end.
In addition, with the Central Model Train show coming up on Friday, I've been hoping to get some progress made on the Central T-gauge Layout. This will be its third year in the show, and I only seem to make progress as the deadline approaches. And so it is true this year. This has also been particularly difficult for me, as it was shortly after this show last year that I was diagnosed with my heart issues and so every project I seem to start reminds me of those days last spring.
One major project has been painting the buildings. They had all received a grey primer coat two years ago, but I really wanted to get them painted and installed on the layout. I started by using a tacky glue to attach each building to a nail or pin to give me a handle to use while painting the building.
This worked okay - but some of the buildings are quite small, and the tacky glue stuck very well. Even too well.
Once attached, I painted the buildings their desired wall color. I selected these colors based on some photos I had of different English villages. Then, I masked the walls with blue painters tape and painted the roofs.
The results are pretty good. There are a few points where I had some bleed through, but I think I can touch those up by hand. I did all the painting with spray paint, but I really could use an airbrush for these projects.
I still plan to add some paint to the windows, doors and other details when I do the touch ups. But the difference is dramatic. However, I have learned a bit about these 3D printed buildings. They are 1 piece buildings, and masking such tiny buildings is challenging. I think I would design them differently. But they were not my designs, although I may make some buildings of my own for the next T-gauge project. I will make those with painting and decoration in mind.
Cameron Turner
In addition, with the Central Model Train show coming up on Friday, I've been hoping to get some progress made on the Central T-gauge Layout. This will be its third year in the show, and I only seem to make progress as the deadline approaches. And so it is true this year. This has also been particularly difficult for me, as it was shortly after this show last year that I was diagnosed with my heart issues and so every project I seem to start reminds me of those days last spring.
One major project has been painting the buildings. They had all received a grey primer coat two years ago, but I really wanted to get them painted and installed on the layout. I started by using a tacky glue to attach each building to a nail or pin to give me a handle to use while painting the building.
 |
| Tacky glue on a nail head. |
 |
| Building on its post. |
 |
| It takes a village! |
 |
| Masked buildings receiving a roof color. |
 |
| Some sample buildings. |
Cameron Turner
Wednesday, February 5, 2020

Subscribe to:
Posts (Atom)