Friday, August 28, 2020

A Momentary Aside - Swanton Pacific Railroad

 The fires in California have ravaged a lot of land and property. But I heard the other day that they have claimed a railroad that is closer to my heart. My mom attended Cal Poly, and they have a 1/3rd scale railroad, the Swanton Pacific Railroad. Unfortunately, the fires claimed 3 of the four engines and numerous cars and railroad structures.


Damage to the SP locomotives.

They are raising money to restore the railroad. If you would like to donate, please use this link. I made a donation in memory of my mother earlier today.

Cameron Turner

Wednesday, August 26, 2020

Wordless Wednesday


A Blizzard in the High Country of Colorado on the Moffat Line. Photographer Mike Danneman.

Cameron Turner

P.S. I just found out this photo is another one of Mike Danneman's great work. See more of his work at his flickr site.

Thursday, August 20, 2020

Simulating Coors - Part 3

At the end of Part 2, we had performed the Table Job and had brought the loads generated by that job back to East Yard. The next job randomly selected is the Heavy Beer Job. Now, the jobs are not equally likely. The probabilities of each job are shown below:

Coors Job Probabilities.

Note that the East Yard Job is not included, as I intend for it to be a ongoing job, or if there is only one crew operating the branch, then switching East Yard becomes a standard job before/after each job.

Last time, I also forgot to include the paperwork generated by the program, or the "job ticket" or switchlist for each job. Here is the Job Ticket for the Table Job performed last time.

Job Ticket for Table Job.
 

When implemented, I intend for the Table to be controlled with an Arduino at the Brewery using a traffic light system like that used at Coors. A green light on the table spot indicates that the table spot is a fully loaded car. A yellow light will indicate a partially loaded car and a red light indicates that the car is loading. Once a switching move is completed, the operator will push a button which will lead to a change in the lights within a short time period (i.e. 30 seconds) indicating that the next move has been determined. The Arduino would indicate the Keg track location for any partially filled cars. 

As of the end of the Table Job, the current status of East Yard is shown below:

The Heavy Beer Job ready to Depart East Yard.

In this case, the Heavy Beer Job will run with only two Coors Tank cars dedicated to this service. 

Coors Tank Car used in Concentrated Beer Service. Photo by Lionel Trains.

Since a new job has been initiated, we update the status of cars being worked around the layout. The changes to the Brewery area are shown below.

Updated Status in the Brewery Area.

So, the Heavy Beer Job has arrived in the Brewery area (Top Center) and we can see that the two yellow cars are now loaded, and the two cars with yellow outlines are now unloaded. Since all seven cars on the Heavy Beer Track are now loaded, they will be collected and returned to East Yard.

Heavy Beer Job ready to return to East Yard.

Upon returning to East Yard, the Heavy Beer Job will add those cars to a departing train for interchange.

Heavy Beer Job returning to East Yard.

So, in this case, only 2 cars were spotted on the branch while seven cars have been removed. So, we have pulled 12 cars and spotted 8. So, while after 1 job we were spotting more cars than we pulled, now we are pulling more cars than we spot. But these are the natural fluctuations I desire to see on the branch, as long as they balance each other out over time.

The job ticket for this job looks like the following.

Heavy Beer Job Job Ticket.

With this job completed, the next job randomly selected turns out to be the Brewery Service Job. In this case, we once again simulate and update the loading/unloading status around the layout, and note that on the last job cycle, one of the cars whose status changed was the car at the Waste Treatment Spur located off East Yard. This spur is served by the Brewery Service Job, in addition to spurs located at the West end of the Brewery Complex. In fact, since this is the first time that this job has been run during the shift, we also allow the job to work the Brewery Team Track. To allow time for loads to be placed/removed from cars in the team track, I only allow this track to be worked once every shift of the Brewery. A shift is currently defined as 25 jobs. This value can be adjusted so that the team track is generally worked only once per operating session.

At the beginning of this job, East Yard looks like the following:

East Yard at the Start of the Brewery Service Job.

The train length was randomly determined to be eight cars. Analysis of the spurs to be worked indicated that there are 5 cars ready to be picked up and 10 total spotting locations available. Had there been less than 8 spotting locations available, then the train length would have been limited to what was available.

Before leaving East Yard, the Brewery Service Job will work the Waste Treatment Spur. 

Working the Waste Water Treatment Spur.

The car picked up from the Waste Treatment Spur would be immediately delivered to the departure track as there is no reason to haul the car around the brewery. Consequently, a 7 car train departs East Yard. 

Departing East Yard.

Most of the work to be conducted occurs near North Yard, which will look like this upon the arrival of the Brewery Service Job.

Brewery Service Job working the North Yard Area.

Notice that one of the tasks here is to refill the coal track serving the rotary dumper. This track takes three cars, but only two have been brought in the train. Not a problem though as extra cars are on standby in North Yard. These cars handle either overflow hoppers or will provide additional hoppers to this track. In this model, this is the purpose of North Yard.

North Yard Switching Complete.

The remaining three tanks cars are destined for the Caustic track at the Packaging Plant. This track appears on the Brewery Area portion of the schematic.

Brewery Area to switch the Caustic Track.

Here, we switch out the empty tank car and replace it and the two empty spots with loaded tank cars. 

Work Complete - time to head back to East Yard after organizing the train at South Yard.

We would them run back to South Yard and use the run-around track there to organize the train before returning to East Yard.

Brewery Service Job Returns to East Yard.

Back at East Yard, we place our collected cars in the departure track and complete the Brewery Service Job. The job ticket looked like this.

Brewery Service Job Ticket.

At the end of the job, East Yard now looks like this.

East Yard after the Brewery Service Job.

Once again, a job is randomly selected, and this time the McIntyre Job is pulled from the list. The associated job ticket looks like the following.

The McIntyre Job Ticket.

The McIntyre Job works in two different ways depending on the status of the cars at the elevator. In this case, the cars at the elevator are interchanged hoppers, which were delivering grain to the elevator. This job will replace those three hoppers with intraplant Coors Hoppers, and will take three new loaded hoppers to the McIntyre Yard. When this small three car train arrives, McIntyre Yard looks like this.

McIntyre Yard when the McIntyre Job Arrives.

The McIntyre Job is the only job that runs east from East Yard on the Coors Branch. The three loaded hoppers must be placed on the corresponding track for their load (Hopps, Barley and Rice) at the end of the track.Once these moves are done, the three empties from the elevator are pulled. Then the three intraplant empties from the cleanout track are spotted in the elevator, and three empties from the storage track are moved to the cleanout track. As a result, once these switching moves are complete, the train looks like this.

McIntyre Yard after the switching is completed.

The train then returns to East Yard with three covered hopper cars for interchange.

Returning to East Yard after the McIntyre Job.

There are now 21 cars ready for interchange from the Coors Branch to the Golden Branch. In addition, 19 cars from East Yard have been spotted around the branch. Not quite a 1-for-1 exchange, but pretty close. After these moves are complete, East Yard looks like this.

East Yard after four jobs have run.
 
This has been another long post, but I have a bit more to share about this exercise. So, I think I will end this post here and pick up the operating session with the fifth job assigned, the Table Job. This is the first time we have repeated a job, and so I want to discuss the rules about repeating jobs that I worked into the operating scheme in Part 4.

Cameron Turner


Wednesday, August 19, 2020

Monday, August 17, 2020

Simulating Coors - Part 2

 In Part 1, we looked at the different jobs operated on the Coors Branch. Today, I want to describe how these jobs will be selected and how I built a simulation of the operations of my Coors Branch. Rather than look at the track plan, I think today we will focus on the schematic of the branch line.

Schematic View of the Coors Branch.

Generally, operations start at the East Yard with the East Yard Job. The East Yard Job would sort cars in East Yard, break down trains arriving from the Golden Branch or from other jobs on the Coors Branch, and build trains for Coors Branch Jobs or to be interchanged back to the Golden Branch. Occasionally, cars arriving at East Yard may also be bad ordered and sent to the RIP track for a period of time.

When a Coors Branch Job is needed, a computer system will update the status of cars previously spotted on the branch. For each job, there is a probability for which each car in a particular job location of the layout have changed state (i.e. loaded-to-unloaded or unloaded-to-loaded) since the last job was initiated. The probabilities for each individual car being worked are shown in the table below.

Work Probabilities by Regions of the Coors Branch.

These probabilities could be individually tuned so as to prevent work from being completed too quickly (generating too many cars from the sidings) or too slowly (clogging the sidings with cars in process). Thus, the program determines what cars are ready to be returned to East Yard for interchange. 

With the number of cars that are ready to be returned from the job site identified, these spots and any unoccupied spots are considered as possibilities for new cars to be delivered from East Yard. The program then randomly determines the exact size of the train within the limits specified by the job and which spots will receive cars from East Yard. Based on those locations, the program then determines the type of car needed. If a track can receive different types of cars, the appropriate type is determined randomly. If it is available in East Yard, it can be sent, otherwise the East Yard Master will need to request that car from the next Beer Train and place a hold on that delivery meaning that the car is delivered the next time that job is called after the car is delivered to East Yard. 

Any empties currently in the spots for the deliveries must be picked up and returned to East Yard by the Job, and those cars are assigned by the program to the job ticket. Any remaining space space on the job ticket is then filled by the program with additional cars on that job waiting for pickup if any.

Let's look at an example. Initially, East Yard looks something like this:

Initial East Yard Configuration.

The engine Coors 993 (black box with red outline) is assigned a train of 6 empty refrigerated cars (RP), on East Yard Track 02. East Yard is populated with a bunch of cars, some loads (black outlines) and some empties (no outline).  The job assigned is the Table Job which will work the Tables at the Brewery. Initially, this area of the layout looks like this:

Initial distribution of cars at the Brewery.

Again, cars that are empty have no outlines, partially loaded cars have a dashed outline, and loaded cars have a solid outline. The red cars are Coors dedicated cars, while the blue cars are interchange cars. After the job is assigned, work is simulated throughout the Coors complex. As a result, the status of several cars in this area of the layout update (as do cars in other part of the layout). 

Brewery cars after the first work update prior to the Table Job starting.

You see four cars in this area of the layout that update. One car on Brewmaster Track #2 is unloaded (Yellow Outline). In addition, on car on the Keg Track, the Heavy Beer Track, and the Transload Track are loaded in this period (Yellow Filled Cars). Now the Table Job arrives, and begins to work the table. The first table position to finish loading is Table 7, which actually produces a partially loaded car which needs to be transferred to the Keg Track, position C.

Keg Table 7 produces a partially filled car.

An empty RP car from East yard is placed on Table 7, the partially filled car from Table 7 is sent to the Keg Track, Position C, and the Loaded car from Position D of the Keg track is stored on the Table Spur in Position A. This looks like:

Completed moves from the first Table move.

With these moves made, the Table then finishes loading Table position 1 (with a fully loaded car this time), which is then replaced with an empty RP car from East Yard.

Completed moves from the second Table move.

The third table move is a fully loaded car in Table 9. Again, it is switched for an empty car. 


Completed moves from the third Table move.

The fourth table move is a partially loaded car on Table 5. This car is moved to the Keg Track, Position F.

Completed moves from the fourth Table move.

The fifth table move is the generation of a fully loaded car from Table 3.

Completed moves from the fifth Table move.

The sixth Table move is the completion of the loading of the car in Table 7, which was delivered earlier in the Job. The Tables are actually randomly ordered, with some guidelines that prevent a Table from being filled in one turn and fully loaded immediately. But the same Table spot can be served more than once during the job.

Completed moves from the sixth Table move.

At this point Coors 993 would then take the train from the Table Spur and haul the train back to East Yard.

Table Job ready to return to East Yard with five loaded cars.

Arriving back at East Yard, the cars would be delivered to a departure track. East Yard would be switched to put these cars in an appropriate order for interchange, and based on the next job called, an appropriate train would be assembled in East Yard.

I'll pick up this operation in the next post on the subject. So far, we have transferred 6 empties into the layout, and pulled 5 cars out ready for interchange. Ideally, we want the number of cars in and out of the layout to be the same, otherwise the branch will eventually be empty or it will be completely full of cars. Neither of which is desirable. Can we determine if the incoming flow is balanced with the outgoing flow.

Cameron Turner

Saturday, August 15, 2020

Simulating Coors - Part 1

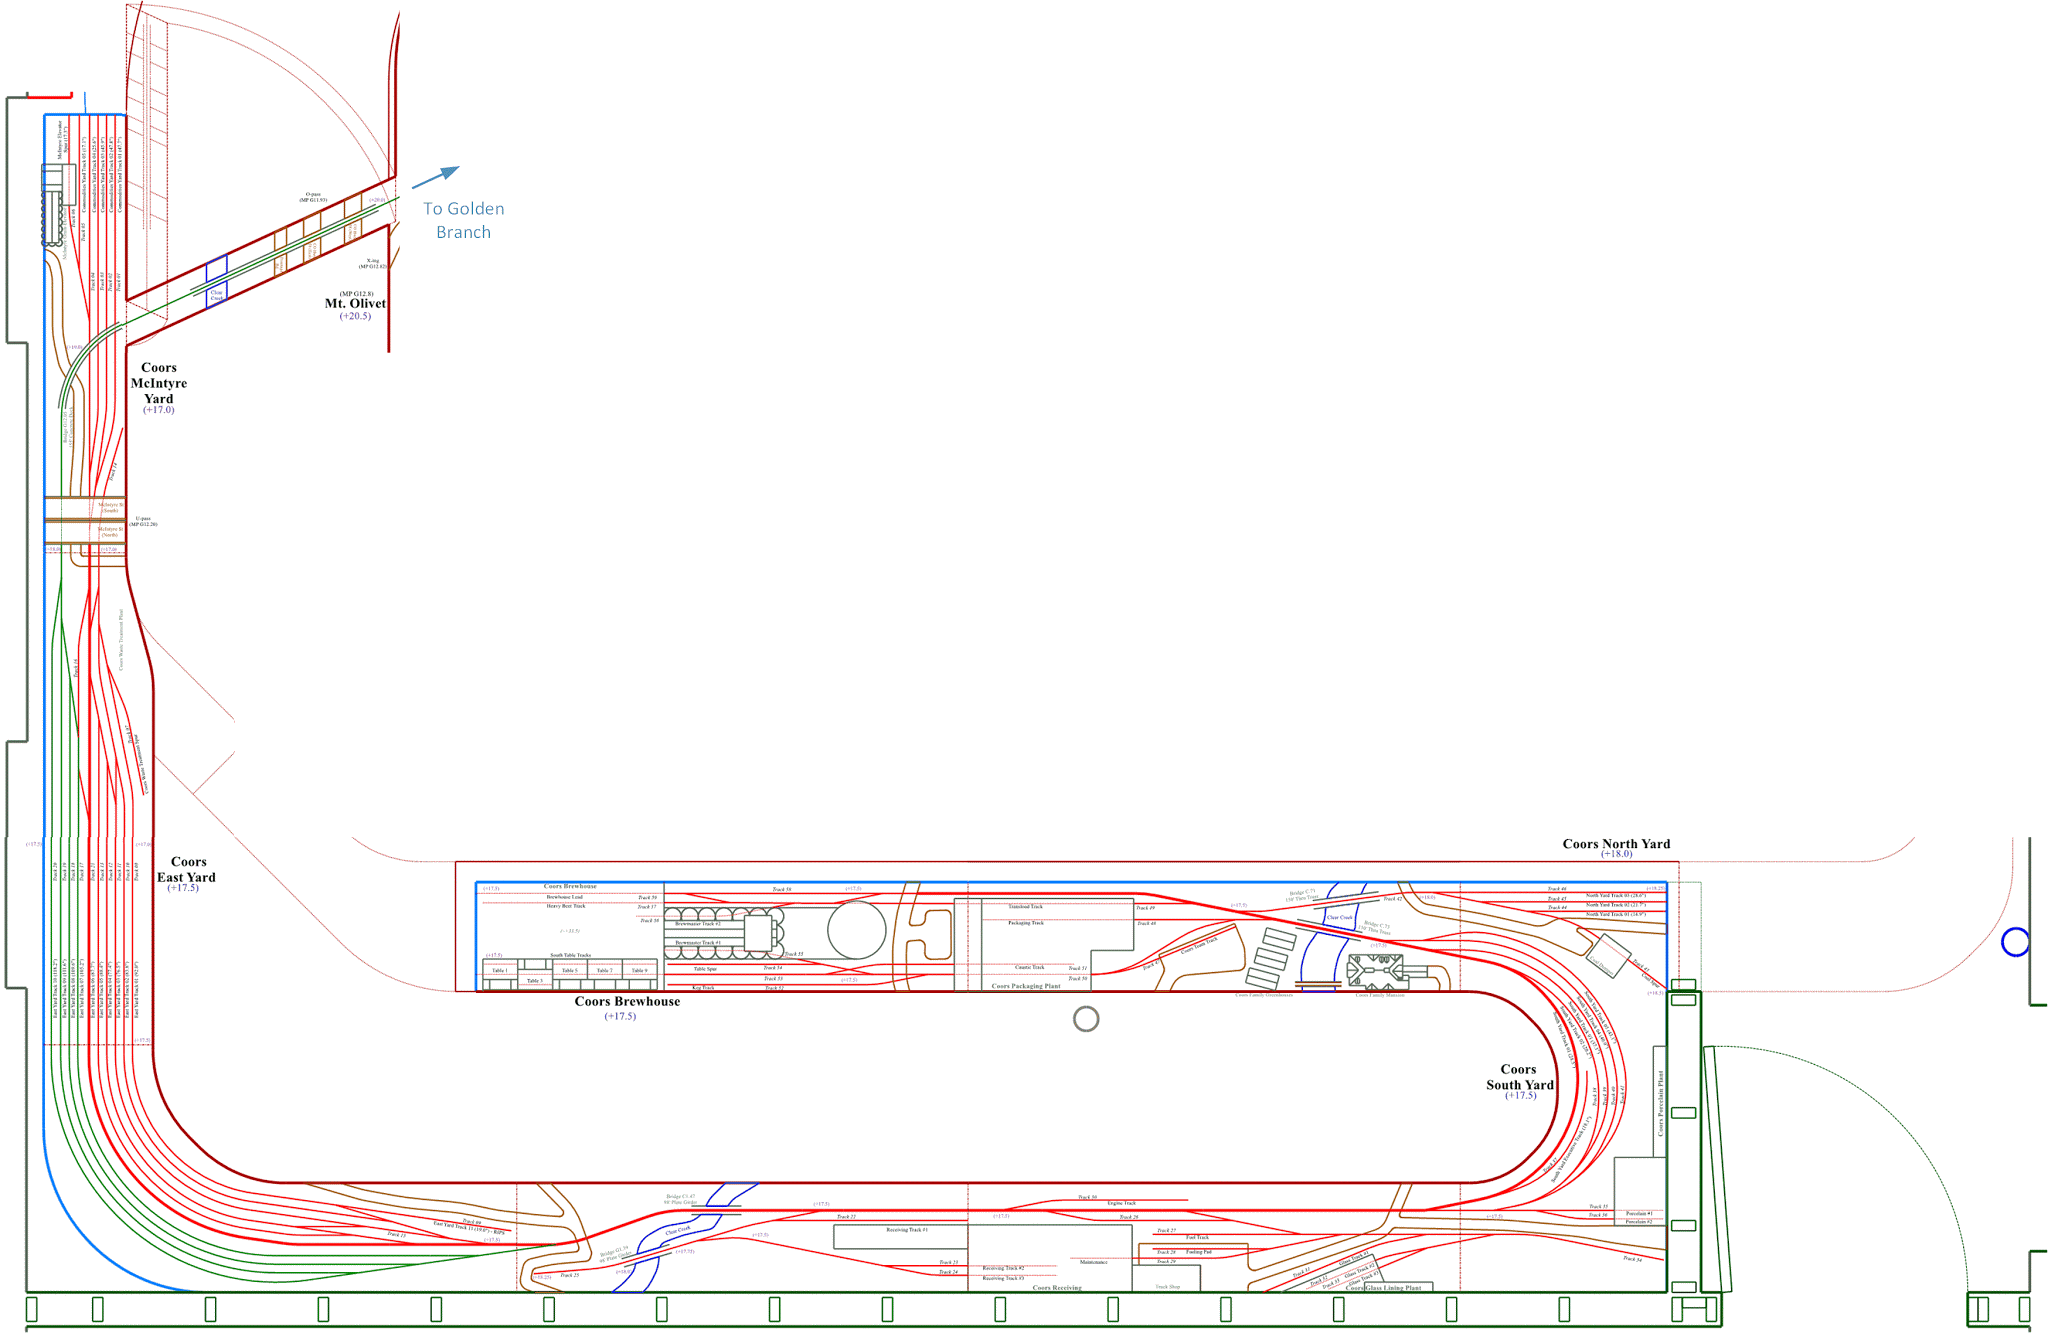
My goal of modeling the Coors Brewery near where I grew up led to a long linear track plan. The overall layout is about 54 linear feet long, or about 1.6 scale miles.

Coors Branch Configuration.

One of the key elements in this plan is the desire to be able to operate this branch synchronously or asynchronously with the rest of the layout. In other words, I want to be able to operate this branch while the rest of the layout is also in operation (synchronously) or to operate the branch on its own when the rest of the layout is either not operating, or is between operating sessions. Furthermore, I wanted the branch to work much more like an industrial line, where the line simply receives cars and ships cars. The connecting railroad delivers specific loads to the plant along with requested empties. However, the returned loads are returned with a manifest for their destination. I did not want that manifest to be generated external to the branch, thus specifying that specific cars were to be loaded with specific loads for specific destinations. Furthermore, I wanted to be able to vary the number of operators needed to run the branch from 1 to 3 or more. Three is probably the limit for this configuration.

So, the operating plan I developed for the Coors Branch simply receives cars at East Yard. If those cars are loaded, they are destined only to specific parts (jobs) of the branch, which can be readily determined by the East Yard Job. 

East Yard Job

The East Yard Job performs yard work at East Yard. It breaks down incoming trains from the Golden Branch, constructs outgoing trains for the Golden Branch, and constructs the local trains for each job on the Coors Branch. There are 8 possible jobs, seven of these would require the East Yard Job to construct a train of 1 to 8 cars. These 8 jobs include:
  1. McIntyre Job (A and B)
  2. Receiving Job
  3. Glass Job
  4. Table Job
  5. Heavy Beer Job
  6. Canning Plant Job
  7. Brewery Service Job
  8. Locomotive Service Job
Let's talk about each job:

McIntyre Job

Coors Branch McIntyre Job.

There are two flavors of the McIntyre Job which I call A and B.

McIntyre Job A - If there are intraplant (in-plant) covered hoppers loaded at the elevator in the McIntyre Yard area, these are loaded cars destined for the Brewmaster Tracks at the Brewery. These cars are pulled, and replaced with 3 loaded hoppers from the McIntyre Yard. One of the loads will be Rice, one will be Hopps and one will be Barley. Each of these cars is pulled from a separate yard track in McIntyre Yard. The loaded intraplant covered hoppers are then taken the length of the layout and are delivered to the appropriate Brewmaster track at the Brewery where they are exchanged with the empties in that track. The empties are then collected and are returned to McIntyre Yard and are placed in the intraplant storage track. This job takes loads and spots them to become empties.

McIntyre Job B - If there are external covered hoppers at the elevator in the McIntyre Yard Area, these cars are empties. These empties are taken to East Yard and exchanged for 3 loads (one Rice, one Hopps and one Barley) at East Yard. The job returns to McIntyre Yard with these loads and places them in the appropriate tracks in the yard. Then the job takes intraplant hoppers from the cleanout track and places them in the elevator track for loading. An equal number of intraplant hoppers are then moved from the storage track to the cleanout track. This job takes loads and returns with empties.

These two jobs form a repeating job cycle that moves material from the outside world into storage at the McIntyre Grain Elevator and on to the Brewery for brewing according to the recipe specified by the Brewmaster. This job where loaded grain hopper cars will be sent. The empty hopper cars from this job would be returned on the Beer Trains to the yards in Denver.

Receiving Job

Coors Branch Receiving Job.

The Receiving Job works the Receiving Plant at the Brewery Complex. Either loaded box cars, or tank cars loaded with either fuel or lubricating oil are received at East Yard and sent to the Receiving Plant. The East Yard Job builds a train of 5 to 8 cars (8 cars being the limit for a train on the line) and sends it to the Receiving Plant. There up to 8 cars that have been unloaded and are now empties are pulled and the loaded cars are spotted based on their contents as specified by the East Yard Job. The number of empties returning may not be the same as the number of loads sent to the receiving plant. There are five spurs that are served with this job. Fundamentally, this job takes loads and returns with empties.

Zoomed In Receiving Job. For scale, the Receiving Plant is 54" long (720 scale feet).

Glass Job

Coors Branch Glass Job.

The Glass Job works the Glass Lining and Ceramic Plants at Coors. This job takes 1-4 cars from East Yard, some of which may be empties and others which may be loads, and exchanges them at the five spurs that serve the Glass Lining and Ceramic Plants at the Coors Brewery facility. Unlike the other jobs, the cars coming and going are a mixture of loads and empties.

Zoomed in Glass Job Area. Both Plants are built against the backdrop.
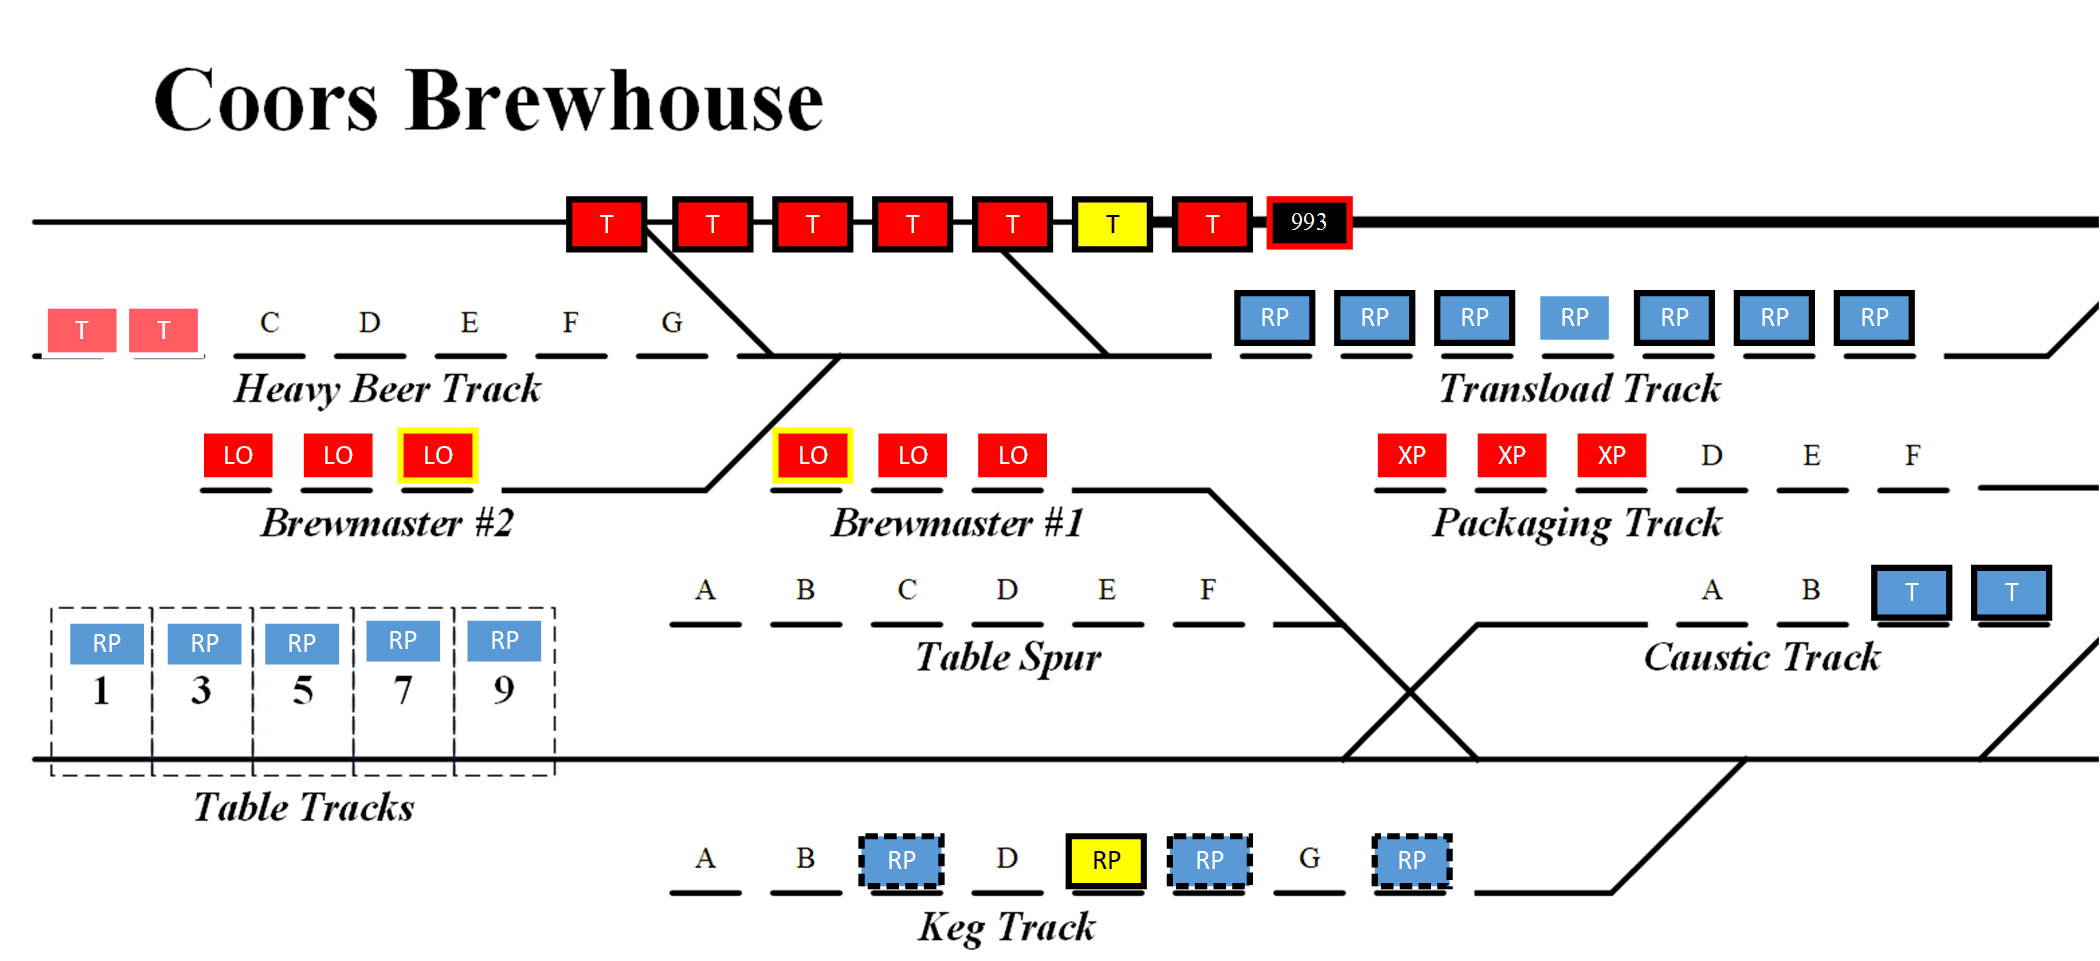
Table Job

Coors Branch Table Job.

The Table Job is one of the most interesting jobs at the Coors Brewery. The job occurs in a concrete canyon in the Brewhouse. The prototype has both a north and a south table job, while I have only modeled one. One of the novel features is that the switching takes place on a series of serial transfer tables that allow cars to be loaded in any order while all cars are aligned in parallel against the loading dock. The tables are aligned so that the car on Table 3 (in the Figure below) can be extracted. 

Zoomed In view of the Table Job. The modeled Brewhouse will be 60" (800 scale feet) long.
  
Five transfer tables are modeled (the prototype has more). Cars may be pulled that are partially filled may be transferred to the Keg Track where loading may be completed, or when they may be transferred back to the tables. The Table spur provides space to store cars waiting to be delivered to the Tables, or cars that are now fully loaded from the Tables or Keg Track. The behavior of each table will be randomly controlled, so the job operator will have to follow indications about which cars need to be moved from the tables in what order.

The Table job would take 5 to 8 empty cars from East Yard. If there is a South Yard Job working, these cars are delivered to South Yard, and the South Yard Job would provide a like number of cars to the Table Job. If the South Yard is not operated, then the Table Job goes straight to the Brewhouse. Empties are exchanged for loads, and loads are returned to East Yard.

Heavy Beer Job

The Coors Brewery ships concentrated beer to other bottling locations. These concentrated beer loads are called heavy beer - hence the Heavy Beer Job. The Concentrated Beer is carried is Coors owned tank cars specific to that purpose. I am assuming that the cars are cleaned before loading at the Heavy Beer track. 

Coors Branch Heavy Beer Job.

The Heavy Beer Job consists of 1 to 7 empties sent from East Yard. Just like the Table Job, South Yard may be used as an intermediate destination. The empties are exchanged for loads at the Heavy Beer Track at the Brewhouse. 

Zoomed In Heavy Beer Track.

Since all the cars used in this service are dedicated cars, they should be easy to identify in East Yard. This is also a simple empties arriving and loads departing operation on the Coors Branch.

Canning Job

Coors Branch Canning Job.

The Canning Job works the canning and bottling lines at the Packaging Plant. The Canning Job takes 5 to 8 empties from East Yard, uses South Yard as an intermediate destination, and proceeds to swap empties for loads at the Transload and Packaging Tracks. These loads are then returned to East Yard for interchange.
Zoomed In Canning Job Spurs.


Brewery Service Job

Coors Branch Brewery Service Job.


The Brewery Service Job works spurs located at East Yard (The Coors operated Sewage Treatment Plant for the City of Golden), the Caustic and Team Track near the Packaging Plant and the Coal Plant located near North Yard. This job would take 2 cars to the Sewage Treatment Plant, and 1 to 6 cars to the spurs at the west end of the branch. This job uses North Yard as an intermediate destination, and at North Yard, the Job swaps cars waiting at North Yard for the cars it is delivering from East Yard. The cars taken from East Yard are then delivered to the individual spurs. Empties from this operation are returned to East Yard.


Zoomed In Brewery Service Job Spurs - East End.

Zoomed In Brewery Service Job Spurs - West End.

Locomotive Service Job

Coors Branch Locomotive Service Job.

The final job is the Locomotive Service Job. The priority for filling jobs on this branch is an East Yard Switcher, the Coors Branch Job, then the South Yard Switcher, and if necessary, a second or even a third Coors Branch Job. So, there could be up to five switchers in operation at any time. However, it is more likely that there will generally be 2 or 3 crews at most due to the space available.

The locomotive service job would randomly recall one of the switchers from its current work task, and that crew making a trip back to the Locomotive Servicing Tracks for refueling, sand, lubrication or other running maintenance. Once completed, that engine could return to its previous assignment.
Zoomed In Locomotive Service Job Spurs.

Each of these jobs on the branch corresponds to work performed by the switching crews at Coors. Yet, the branch can be operated with a single crew (who would perform the East Yard Job and then one of the 8 branch jobs described above), or with up to five crews, which would include an East Yard Job, a South Yard Job, and three branch jobs. In this scenario, at any one time, one of these jobs would work out of South Yard (performing the Table, Heavy Beer, Canning, and Brewery Service Job - East End), a second would work out of the East Yard (performing the McIntyre, Receiving, Glass, and Brewery Service Job - West End), and the third would work as an East-South Yard Transfer Job. These jobs would be rotated among the three Branch Job operators. 

But how would the particular job to be performed be determined? That will be covered in Part 2.

Cameron Turner