Showing posts with label 3D Printing. Show all posts

Monday, February 17, 2020

Project Segway - Another Bridge and Another Building

I also said I was working on another bridge for the layout. I decided that I needed something to the left of the station before the tunnel portal, and a bridge seems like a good choice. It also will allow me to add a small stream and waterfall into the layout.

I picked a deck girder bridge for the plan, and found a plan on the internet. I was able to turn this into a 55mm long bridge in T, which makes it 24.75m long (81.2') which is a good size bridge.

New 55mm Plate Girder Bridge in T-scale.

I did not plan the bridge far enough ahead of the show to have it on hand for the show, but the bridge arrived from Shapeways on Friday.

Just arrived from Shapeways.
The bridge is currently being prepped for priming. I hope to add it to the ModelWorks shope next week after I get it painted.

Along with the bridge, I also got a pair of 3D printed Pattern Makers Pins. These pins can be used to align adjacent train modules. They were used in the MR Canadian Canyons Project layout.

Pattern Makers Pins.
I haven't had a lot of luck ordering them from the same source that MR used - and I haven't found a domestic US source. So, I thought I would make some of my own. They mate with a 0.1mm tolerance (as-built). So, if installed properly, they should make it feasible to align two sections of a layout to a tight tolerance. The design is very close to being ready, but needs a little more work.

I also have one more project coming from Shapeways this week. Fresh off painting all those T houses for the layout, I decided to design one of my own, this one with interior detailing and that could be printed in kit form for easier painting by separating the walls and roof. And if I was going to do the interiors, that also meant separating the walls and floors inside.

950 sq ft T-scale house model.
I have both a kit version and an assembled version on order from Shapeways. I'm looking forward to seeing the first prototypes, and even maybe having to find a spot for them on the layout.

Cameron Turner

Sunday, November 10, 2019

A Momentary Aside - A little HOn2z Progress

Sometimes, even the best plans go amiss. Yesterday, was the NMRA Palmetto Division of the NMRA fall meeting. I had planned on going, but a combination of a tweeked back and not feeling particularly well led me to pass on the meeting.

One of my goals, going back even before my surgery has been to earn my Master Model Railroader (MMR) certification. Not because I feel the need to demonstrate my skills, but as a means of improving them. While I primarily model in N-scale, I dabble in Z, T and in HOn2z (2' gauge, HO scale using Z-scale track). And I cannot confirm or deny the presence of some On30 in my basement either. But it is the HOn2z that I am taking an aside to discuss today.

I had been thinking about bringing my HOn2z projects tot he meeting to show, but alas, I do not have things at a point where I want to show them yet. Most are incomplete, but I thought I might preview a couple of pictures.

Gilpin Gold Tram Ore Car.
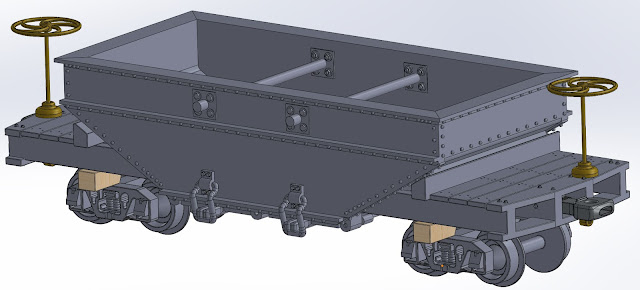
 Most of my efforts are focused towards the Gilpin Gold Tram, a 2' gauge line that ran out of Central City and Blackhawk, Colorado.  Despite being HO scale, the cars are similar in size to N-scale cars, and they ride on Z-scale trucks and track. The cars are all being 3D printed and then I am assembling them and finishing them. The ore car above has just had the two cross bars that connected to the chains the connected to the doors of the ore car. There is still some work to be done, but the car is making progress.

Gilpin Rail Car.
The latest car to get started is this Gilpin rail car. Basically an open frame used to move sections of rail and steam boilers along the line, I printed this car primarily in brass to get sufficient weight on the car.

More of the fleet.
And the rest of the fleet. There is a water car (upper left), a stake bed flat car (left), 2 more typed of ore cars (middle), a gondola (upper right) and several flat car frames are all under construction. It is nice to have something to do when I do not want to work on planning, and maybe this will even lead to yet another little layout project. Stay tuned!


20 days to go. 20 Posts to go!

Cameron Turner

Friday, October 25, 2019

Project Segway - Signals


(Occasionally, other events do occur and so I will from time to time go off-topic to discuss another railroad related project or event that is going on currently – we will get back to our regularly scheduled programming…)
A Classing PRR/N&W Signal. 
It seems that I am doing a lot of other projects these days. One of the latest is a signal project for Bob Folsom's HO N&W Model Railroad. Bob had purchased some 2mm LEDs and had figured out how to wire them up to create his signal system. What he was lacking was a viable set of signal heads for his railroad. That is where I came in and designed and 3D printed a set of heads to his specifications.

I printed 6 different round head configurations with block-out plates over any unused holes, and 3 different single row configurations. In addition, I designed the finials for the top of the signal poles and built them into test assemblies. These went out to Shapeways for fabrication in black PA13. The test prints came back and looked pretty good.

Round Signal Prototypes.
Single Row Prototypes.
The holes are just about perfect for the selected 2mm LEDs, generally forming a solid press fit.

Round Heads with an LED installed.

View from the back. Once painted the back of the LED should resemble the mechanical components at the rear of the signal.
There were a few minor printing flaws int he prototype signals that need to be resolved, and Bob has identified a still smaller LED that should fit even better into the back of the signal head. But, the first prototype has been constructed and is working.

Prototype Signal Head showing Clear.

Approach Clear.

Restricting Signal.

Diverging Clear Signal.

So, a few more tweaks, and my side business, the Model Works at Otowi Station will have a set of new products and Bob will have the parts to build all the signals his layout needs. Come to think of it, I have some other projects to finish for that business.

Cameron Turner


Thursday, October 10, 2019

Project Segway – Designing a Camera Mount


(Occasionally, other events do occur and so I will from time to time go off-topic to discuss another railroad related project or event that is going on currently – we will get back to our regularly scheduled programming…)

I will get back to the Moffat Plan, but other things have been going on while I have been thinking about options. One of those "things" was a project that sat on my desk since my surgery in March. I found it and figured it was time to get it finished.

The task was to design a mount for a camera board into an HO-scale E-unit for the Central Model Railroad and Historical Association.

The Camera Board next to the HO scale E-unit shell.
Since the unit is unpowered, there is a lot of internal space. In fact, the board fits nicely inside the shell. However, the camera is the small circle on the black component on the left end of the pig tail on the board. The key to the mount is to provide a means to control the direction in which the camera is pointed while allowing the board to be secured within the engine.

Progression of the design.
I took some measurement, and drew up a simple mount, which I then printed using a consumer grade Da Vinci 3D printer and PLA filament. The first design was a simple block, which fit well enough, but caused interference with the plastic glass parts used in the model for the lighted number boards and the porthole windows. The second generation design provides a better slot for the camera, as well as enough space for the number boards, but the fit was too tight for the porthole windows. The third design provided ample space for the entire assembly to slide into the body shell. 

The camera board mounted on the mount. Eventually two screws and standoffs will be added.
The 3rd generation design fit nicely into the body of the locomotive. From the fit of the mount, it looks like the camera lens will align with the logo on the nose of the engine. 

The camera mount placed in the shell of the locomotive. 
Even from the nose, the mount is virtually invisible within the locomotive.
The locomotive reassembled.
The locomotive and mount have been returned to the club where the shell will be modified for the lens, and the locomotive placed into service on the layout. Soon, we will have videos of the trains touring the layout.

Cameron Turner

Tuesday, September 11, 2018

A Sidebar Project

I have some side interests. And sometimes they take my attention away. I had been planning to finish the bridges for the T Layout, but somewhere I misplaced a set of 3D printed detail parts. So, just order replacements right? Well, I decided that I didn't want to do that until I had a few other files ready for printing, and these files involved cars for an HOn2Z Gilpin Gold Tram layout I have been toying with as a short term project. The key to the layout, and whether or not I pursue it though is the ability to make the cars/engines the way I want to, namely, not in HOn30, but in what I have taken to calling HOn2Z.

Yep, rather than use N-gauge track which is really about 30" in HO, I decided that I really liked using Z-gauge track. A quick calculation showed that the 6.5 mm gauge is a little less than true HOn2 (which would be 7 mm gauge). I was even a little surprised to find out that there is an HOn2 set of NMRA standrads for 7 mm gauge, so this is not going to be HOn2. In fact, technically, it is 22.3" gauge, so really, it might be HOn22, or as I coined it HOn2Z.

By using Z, I can use existing track if I want, particularly turnouts like the new Atlas Z scale turnouts. Plus, I already have done a lot in Nn3 which also uses a 6.5 mm gauge, so it makes sense. Add in wheels and trucks from Microtrains, and a bunch of mechanisms - well, I like HOn2Z. So, now for the cars.

Well, I got a bunch drawn up for printing to pass the Shapeways requirements. The Gilpin has 3 ore car types as shown below.

Gilpin Half Cord Ore Car (Type 1)

Gilpin One Cord Ore Car (Type 2)

Gilpin One Cord Ore Car (Type 3)
I designed them around Andrews Style Z-scale trucks from Microtrains. The wheels are close, but a little small for most of the Gilpin cars, although the truck style is wrong. I decided to live with the wheels so that the cars operate well, and have a consistent coupling height (Gilpin cars actually had different coupler heights over the years). With a little work, MT couplers could also be installed, but I went with a Link-Pin Style coupler that I designed and had previously tested. I figure if you are going this far, might as well do that well too. Seeing these three car types together really shows the differences.

Left to Right: Gilpin Half Cord Ore Car (Type 1), Gilpin One Cord Ore Car (Type 2), Gilpin One Cord Ore Car (Type 3)
I've also drawn up a set of flat cars. I have drawings for the flat car, and the flat car with stake pockets, but the flat car with stakes is presumed. After all, if you had stake pockets, why not stakes too.


Of course, the stake pockets were likely used to make the gondolas, just as I did in the model.


And, they were also used on the excursion cars.


And, while the Gilpin didn't have any, it is fairly easy to imagine a box car as a combination of a flat car with stakes, and a similar (albeit slightly longer) box car found on some of the Maine 2-foot roads.


In addition, another set of modifications led to the longest car on the Gilpin, at 23 feet, the water car. A few elements of this are plausibly imagined, as the data and pictures simply don't provide answers, but I think it will look reasonable.


Test prints of each are on their way, and I have a few more cars to finish, before tackling the engines. But with some cars coming, track was next. I did find some data about the ties used, and from that, designed a track jig. And using a home grade 3D printer, proceeded to make some tie jigs. 


Each section has a pinned connection to align them. And once they are assembled, I am planning to mount them on a painted poplar board from the local lumber yard. 


I am currently painting the tie gigs to help locate the PC clad tie locations, but once that is done, I will have a tool to lay ties for a couple of feet of track to display my cars, and to include a prototype handlaid stub turnout (just like the real ones used on the Gilpin). So, I may not need the Atlas turnouts, or I may simply use stub turnouts in certain places, and model the line as slightly more modern and upgraded than the actual. If I do build a little layout, it will almost certainly be a protofreelance line, rather than a Gilpin model. After all, I am already going there with the box car. But more on that in a later post.

Wednesday, August 1, 2018

A New Bridge

It has been a while since I have posted, but there has been some slow progress made. Previously, I had shown the pedestrian bridge for the town. I finally had cause to order some parts from Shapeways, and I ordered the bridge too.


On the left is the FUD version, on the right is the professional plastic version. This is a material produced by HP for 3D printing. It is fairly robust, but not quite as fine as the FUD material. The grains you see are not the photograph, but the material. So, for T, not quite good enough for me, but for other scales....

Anyways, the bridge needed a bit of painting to give it a nice brick color, and then some concrete washes to bring out the individual bricks, and the concrete portions of the bridge. I tried several approaches, and actually found that burnishing the paint on with the tip of a toothpick seemed to work best.


One more feature of the bridge is the installation of a mirror under the bridge. In this case, I found a mirrored plastic panel on Amazon.com. This can be easily cut with normal scissors. For a backdrop mirror, I think it works well enough.


You can see the bottom seam of the mirror, but in this case, I have simply set the bridge of a paper printout of the road. I think when I install the real thing, and have the road butting into the mirror, as well as the sidewalks on the sides to add a little 3D definition, and as a result, I expect that the seem will be much more difficult to see.

Against the backdrop, this will be a nice little trick to add depth into the backdrop. Just compare this picture, to the top view of the bridge.


I think it works very well.


Monday, February 12, 2018

After the Show

Well, the show has come and gone. All told we had just shy of 2000 attendees, a 14% increase from 2017. We got there with the layout and had it set up and running in about 30 minutes. Indeed, the layout ran superbly throughout the show. We had about a half dozen minor derailments, generally related to two track joints that seemed to go away as we did a little filling to smooth those two joints a little.

Here is a video from near the end of the first day.


At this point we had run mostly Hanku9000s and a little bit of JR103s. My general impression was that while a 4 car train is not oversize on the layout, the layout looked better generally when there were 2- or 3- car trains running as a rule. There was even some media coverage of the event.

Sandy Eustice being Interviewed by Channel 4
The attention continued the second day. In fact, I heard from some visitors that they had been eating at McDonalds and the staff there told them that they needed to go see the T Layout at the Train Show. So they came! Thanks McDonalds!

We continued running, and I shot a few more pictures, mostly of an abbreviated HST Train set.


So, what did I learn from the first show?

Track Cleaning - I experimented with a couple of approaches, but found that Q-tips seemed to do the best job. For a cleaner, I used both rubbing alcohol and Goo-Gone. About 3 hours of running seemed to be the limit. In addition, a lot of our observers would come up to and even stick their heads right over the layout. I even extracted what looked to be an eye-lash out of a balky loco the first night. I might need to do something about that.

Locomotive Performance - Without question, the 2nd generation mechanisms were much better than the 1st generation mechanisms. However, we may have some casualties. One of the club Hanku9000 power units is running poorly, and both of the HST power units did not run well. I will have to look them over. On my side, I saw a couple of JR103s refuse to run, and my Kiha40 (NIB) would light up, but not run. One of my Hanku9000 power units also went down on the 2nd day, along with one of my HST power units. Part of the problem may have been run times. We ran the Hanku units a lot, and both units that came up balky did so after about 3 hours of continuous running. We estimated that in two days, we ran nearly 1200 scale miles during the show - or about 2.5 REAL miles. Considering that we had only about a half dozen derails, one child godzilla attack, numerous earthquakes induced by observers, and a dozen or so stalls (usually dirty track), I feel pretty good about the runs. However, at future shows, I am going to limit the run time of any one unit. And now I have some rehab work to do.

Scenery - I got a little keyboard cleaning vacuum, and that proved to be a good choice to help clean the trackwork. It was surprising how much stuff kept finding its way onto the tracks. Getting the buildings finished and fixed down is going to be important, and as you can see, one tree was added to the layout. another 500 or so will help too.

Lights - I luckily brought a light to help with some maintenance work. We ended up putting it on to show the layout. We needed MUCH more light. I'm now looking at a valence for the module.

Sound - In this case, an ambient sound module, and even some train sounds could be quite helpful and effective.

Backdrop - It is not too light. It actually looked pretty good. Some of the backdrop is delaminating though, so I will have to rework the backdrop a bit before the next show.

Train Speed - I was able to reliably run the Hankus at about 60mph, and I got the HST units down to 36mph. I don't think that the JR103s ever dropped below 100mph. It was somewhat surprising how fast the trains were going, even when they looked slow to the eye. With magnetic wheels, going much slower is really difficult. Generally, I would say 60-100mph seemed okay with all but the most discerning observers.


Bridges - These were a big BIG hit. So much so that I had multiple requests to buy them. So, up on Shapeways via the Modelworks they will go. In fact, finishing the stone bridge is now a big priority. I did not expect the enthusiasm for the 3D printed aspect of the layout.

So, I got a lot to do before the next show in April - Central Railroad Day. Tonight, I am going to remove the track, and several bridges to clear the way for the installation of scenery and the finishing of the bridges.

As a close, here is a short slideshow of the show on Friday, shot by another member of the CRM&HS.