Showing posts with label Colorado and Southern. Show all posts

Saturday, November 2, 2019

Revising C&S Junction

With a new benchwork configuration in place, I needed to rework the track plan for the new benchwork. For reference, the original benchwork and track plan looked like this.

The Original C&S Junction Plan.

Since this point, I have been able to add some additional details to the track plan, including roads, bridges and buildings. These details were added after I confirmed that the track plan seemed to fit my needs, but I have included them in the images here. I'll explain my process for working in these details in a future post. However, here is the new track plan.

Revised C&S Junction Track Plan.

This configuration gives me some nice new possibilities. The turnback at the left end of the original plan is muted, now being about 120 degrees, instead of a full 180 degrees. Add in the reverse curve, and it helps diminish the feeling that the tracks are looping back on themselves. Furthermore, at the top end of the peninsula, I execute a "Belina drop" where the backdrop will climb up to the upper deck, preventing the engineers from observing the full 180 degree turnback curve. This also minimizes the challenges of the narrow layout section necessitated by the backdrop wrapping around the outside of the Golden Branch helix.

All in all, the new C&S Junction is a better configuration for the layout. The necessary changes to accommodate the new benchwork configuration work well. Finally, the switching near C&S junction is now in its own location, without any other significant switching nearby. Therefore, crews working this area should not affect other crews passing through as much as they would if there was another switching operation in the same aisle area.

28 Days, 28 posts to go.

Cameron Turner

Thursday, August 15, 2019

Going to the Junction....C&S Junction

While the layout is not envisioned as a model of the Burlington Northern operations around Denver, they do impact the operations of the stretch of the Rio Grande I am modeling. The BN mainline headed north runs along North Yard, and the line south through the Platte River valley shared a double track mainline with the Rio Grande (and ATSF) after about 1987 as part of the Consolidated Mainline Project (CMP). This project made Union Station a stub ended station - before this Rio Grande traffic ran past the station on the way to the Burnham Yard and Shops.

This line sees a lot of traffic - today a lot of it is Powder River Basin coal headed south to the Gulf, or empties headed north to Wyoming. In my era, it still saw a lot of traffic, and it was the route that BN used to interchange with the Rio Grande at North Yard. Just past Utah Junction, the BN Main breaks away to head north to Wyoming.

In my plan, I had to delay this departure until after Cargill. This is a slight compromise but allows me to model through traffic from the BN (if I have the operators to do so) and provide a little more complexity to North Yard operations. It is also easy to eliminate if I so desire or find the traffic to be too much for the layout. I'm showing this location on the plan below.

C&S Junction Plan.
So, the BN main departs through the backdrop into a helix to drop below the layout. This helix can then reconnect to the main layout helix with a staging yard in between to create a continuous run for BN traffic. Fortunately, the Rio Grande main (in black) is climbing, and with the BN line dropping, we should have enough clearance. After this mainline split, the Rio Grande main drops to a single track as it crosses Federal Boulevard. Shortly after, the line expands again to provide a lead track for industrial sidings in this area and in preparation for arriving at C&S Junction.

C&S Junction is where the BN Golden Branch departs to go to Coors Brewery in my hometown. I am hoping to include this branch in the layout, but at least plan to represent it with staging. Just as before, I again routed the BN branch into a helix. However, here I make a calculated trade off. In reality, the BN branch should depart towards the aisle. By flipping the junction to the inside of the layout, I allow the branch to disappear conveniently into the backdrop. By going into the backdrop (forming a counterclockwise helix) instead of following the mainline (creating a clockwise helix) the task of hiding the helix becomes much easier. In addition, it allows me to decide later if the branch would be modeled above, or below the existing layout. At this point, without knowing exactly how much of a climb I will be able to achieve before I come back to this spot on the next deck, it could go either way. Hence, the reason why I have to this point based the layout height relative to the elevation of Prospect Junction.

Pushing past C&S Junction, I arrive in Arvada. The Rio Grande skirts the northern end of Olde Town Arvada, while the BN tracks skirt the south side, closer to the old charming downtown. I much prefer the look of charming downtown Arvada, so I plan to have the Rio Grande line pass through here, while the branch would be in the helix anyways. This also gives me a couple more industrial areas to model.

SPINS Map of Arvada, Leyden and Chem Spur.

Olde Town Arvada.
Looks like the perfect spot for some Design Preservation Models and Woodland Scenics kits. So, that brings the design through C&S Junction, and now we would continue our climb towards the first siding on the line, Leyden, as we climb through the western suburbs of Denver on the journey Thru the Rockies...Not Around Them in 1:160.

Cameron Turner

Tuesday, September 11, 2018

A Sidebar Project

I have some side interests. And sometimes they take my attention away. I had been planning to finish the bridges for the T Layout, but somewhere I misplaced a set of 3D printed detail parts. So, just order replacements right? Well, I decided that I didn't want to do that until I had a few other files ready for printing, and these files involved cars for an HOn2Z Gilpin Gold Tram layout I have been toying with as a short term project. The key to the layout, and whether or not I pursue it though is the ability to make the cars/engines the way I want to, namely, not in HOn30, but in what I have taken to calling HOn2Z.

Yep, rather than use N-gauge track which is really about 30" in HO, I decided that I really liked using Z-gauge track. A quick calculation showed that the 6.5 mm gauge is a little less than true HOn2 (which would be 7 mm gauge). I was even a little surprised to find out that there is an HOn2 set of NMRA standrads for 7 mm gauge, so this is not going to be HOn2. In fact, technically, it is 22.3" gauge, so really, it might be HOn22, or as I coined it HOn2Z.

By using Z, I can use existing track if I want, particularly turnouts like the new Atlas Z scale turnouts. Plus, I already have done a lot in Nn3 which also uses a 6.5 mm gauge, so it makes sense. Add in wheels and trucks from Microtrains, and a bunch of mechanisms - well, I like HOn2Z. So, now for the cars.

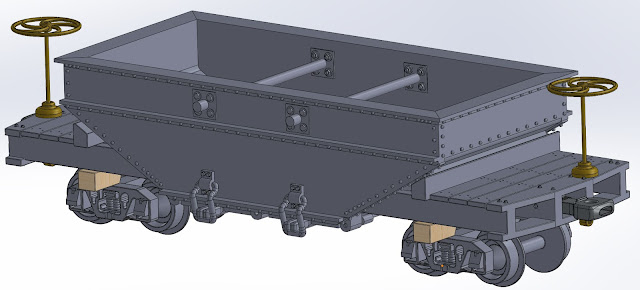
Well, I got a bunch drawn up for printing to pass the Shapeways requirements. The Gilpin has 3 ore car types as shown below.

Gilpin Half Cord Ore Car (Type 1)

Gilpin One Cord Ore Car (Type 2)

Gilpin One Cord Ore Car (Type 3)
I designed them around Andrews Style Z-scale trucks from Microtrains. The wheels are close, but a little small for most of the Gilpin cars, although the truck style is wrong. I decided to live with the wheels so that the cars operate well, and have a consistent coupling height (Gilpin cars actually had different coupler heights over the years). With a little work, MT couplers could also be installed, but I went with a Link-Pin Style coupler that I designed and had previously tested. I figure if you are going this far, might as well do that well too. Seeing these three car types together really shows the differences.

Left to Right: Gilpin Half Cord Ore Car (Type 1), Gilpin One Cord Ore Car (Type 2), Gilpin One Cord Ore Car (Type 3)
I've also drawn up a set of flat cars. I have drawings for the flat car, and the flat car with stake pockets, but the flat car with stakes is presumed. After all, if you had stake pockets, why not stakes too.


Of course, the stake pockets were likely used to make the gondolas, just as I did in the model.


And, they were also used on the excursion cars.


And, while the Gilpin didn't have any, it is fairly easy to imagine a box car as a combination of a flat car with stakes, and a similar (albeit slightly longer) box car found on some of the Maine 2-foot roads.


In addition, another set of modifications led to the longest car on the Gilpin, at 23 feet, the water car. A few elements of this are plausibly imagined, as the data and pictures simply don't provide answers, but I think it will look reasonable.


Test prints of each are on their way, and I have a few more cars to finish, before tackling the engines. But with some cars coming, track was next. I did find some data about the ties used, and from that, designed a track jig. And using a home grade 3D printer, proceeded to make some tie jigs. 


Each section has a pinned connection to align them. And once they are assembled, I am planning to mount them on a painted poplar board from the local lumber yard. 


I am currently painting the tie gigs to help locate the PC clad tie locations, but once that is done, I will have a tool to lay ties for a couple of feet of track to display my cars, and to include a prototype handlaid stub turnout (just like the real ones used on the Gilpin). So, I may not need the Atlas turnouts, or I may simply use stub turnouts in certain places, and model the line as slightly more modern and upgraded than the actual. If I do build a little layout, it will almost certainly be a protofreelance line, rather than a Gilpin model. After all, I am already going there with the box car. But more on that in a later post.

Friday, March 17, 2017

Following the waters home

`I grew up in Golden, Colorado at the base of the foothills of the Rockies. No wonder my interests tend towards Colorado roads, and I have a bit of a narrow gauge interest. So I suppose it should not be a surprise that I would also put the Colorado Central on my list of possible subjects.


The Colorado Central ran from Denver, out to Golden and followed Clear Creek into the mountains. At Forks Creek, the line split, heading to Black Hawk and Central City on one route, and continuing up to Idaho Springs, Georgetown and Silver Plume. Along the way, the line climbs the Georgetown Route, winds through Clear Creek Canyon and serves the mining communities along the way. Perhaps the most famous rendition of the line is the HOn3 Union Central and Northern Railroad, housed in the Cheyenne Depot and built by Harry Brunk. Much of the construction of the model railroad is covered in a series in the Narrow Gauge and Short Line Gazette, and republished in not just one, but two books Up Clear Creek on the Narrow Gauge and More Up Clear Creek on the Narrow Gauge.

Image result for Union Central and Northern Images

The UC&N model railroad also is captured on YouTube in a fun video.


Most of the models of this line seem to focus on the portion of the line west of Golden. Golden and Denver are often unmodeled - or represented with staging. Interestingly enough, the ends of the line interchanged. In Denver, the line interchanged with the major railroads in Denver, and on the western ends, there was the Argentine Central in Silver Plume, and the Gilpin Gold Tram, a unique 2' gauge railroad) in Black Hawk. There are several fantastic books on these lines including Colorado Railroad Museum Annual #10,  Colorado Railroad Museum Annual #26, Georgetown and the Loop, The Colorado Central Railroad, and The Gilpin Gold Tram, and the Gilpin Railroad Era, among others. These connections are particularly interesting. Unfortunately, none of these lines made it past WW2, although part of the line between Georgetown and Silver Plume was rebuilt and operates as a tourist line. Parts of the line were standard gauged, operated by the Colorado and Southern, and today by BNSF as the Golden Branch serving Coors.

Like the other narrow gauge ideas, this one would be a smaller operation. Operationally, the LDEs would include:

  • Denver
  • Arvada
  • Golden
  • Forks Creek
  • Idaho Springs
  • Georgetown
  • Silver Plume (and the Argentine Central)
  • Black Hawk (Gilpin Gold Tram)
  • Central City

The scenic LDEs would include:

  • Clear Creek Canyon
  • The Central City Switchback
  • The Georgetown Loop
  • Mines and Mills galore!
One of the challenges, would be modeling the Gilpin Gold Tram. And herein enters T-gauge again. N-scale is 9mm between the rails representing 4'8.5". A 24" gauge line in N-scale would have a gauge of 3.8mm. At 3.2mm, T-gauge is a little tight (20.2") but it is certainly close to Nn2. I even have an Nn2 prototype of one of the tram cars made through 3D printing. More interesting is that for Z-scale, the track gauge is 6.5mm, and so Zn2 would be 2.8mm, and so T-gauge scales out at 27" in Z. It is not implausible to represent Black Hawk in N-scale, and transition to z-scale while climbing to the mines outside of town. As long as the individual towns are kept correct, I think that T-gauge equipment could be the basis for both Nn2 and Zn2. 

The idea of doing something with the Gilpin Gold Tram has definitely hooked my interest, and I have decided to at least build a small 22"x42" Zn2 layout to test out some ideas and determine technical feasibility. I've include the track plan. 


The plan is based on the Jerome and Southwestern, with some modifications. The key questions are Turnouts, track and equipment. I was able to 3D print a car easy enough, fortunately, there are some T-gauge mechanisms that look to be good candidates for the diminutive little shays that plied the line, and so in my mind, the last hurdle is couplers - at least in terms of the equipment.

But, just in case, I ran another calculation and discovered, that Z-gauge track (6.5mm) is very close to HOn2. Not HOn30" as as been done and popularized by Dave Frary and Bob Hayden, but actual HOn2. Okay, it is a little tight at 22.3" instead of 24", but that is close. Track, turnouts and equipment is easy. Some Z or Nn3 cars are actually kind of close to HOn2, or at least the cars on the Gilpin Gold Tram. There are some possible Z-scale mechanisms that could be motive power, and link and pin couplers are do-able. A shelf layout in HOn2 to have a little bit of the kingdom of Gilpin, is possible. In fact, this post took a long time, because I wanted to finish this.


Description: A Gilpin Tramway Ore Car from the 3rd order of cars, ordered in 1895. The cars were numbered 86-155. Requires some 28 gauge wire to represent the spacing rods across the top of the car, and to represent the brake stems, as well as Z-scale Archbar Trucks. To complete the model, Link and Pin couplers and the Brake Wheel should also be purchased, which are designed to be compatible with this model. In addition, 2 M0.5 0.50UNM Metric Screws are necessary to secure the link and pin couplers. The link can be simulated with 0.7mm wire (such as that used in a paperclip. The car is HO scale, 2' gauge, represented using Z-gauge tracks (6.5mm) which equates to 22.3" in HO scale. Recommended in Frosted Extreme Detail or Frosted Ultra Detail options. Polished materials may have reduced detail.

I am quite pleased with the result and eager to hold the prototype. Getting these files done, became my goal so that I could open my Shapeways shop, and also order my prototype car to see if this vision could be realized. The shop can be found here.


This line is interesting to me - but it offers small narrow gauge power, 2-6-0s and 2-8-0s, but it is interesting. It would b a lower key operation, and more of a model building exercise. I am not sure this is the layout - but it is interesting to consider.