Showing posts with label Helix Design. Show all posts

Saturday, October 12, 2019

Project Segway – The Olympia Helix Tests


(Occasionally, other events do occur and so I will from time to time go off-topic to discuss another railroad related project or event that is going on currently – we will get back to our regularly scheduled programming…)

So, as mentioned previously ( Project Segway –Introducing Olympia iN the Office ), one of the critical components of the Olympia iN the Office Design is the helix. In particular, the ruling helix between Deck 1 and Deck 2. With a ruling grade of between 4.3% and 4.9%, this is clearly a potential problem. The helix is designed as an oval, with 55mm straight sections on opposite sides and end radii of 170mm. In order to test out the feasibility of this design, I built a helix out of foamcore and Styrofoam using Rokuhan sectional track. The test helix consists of 2.5 turns.

Olympia Helix for testing.
Testing of the helix proceeded with several different mechanisms, including a Rokuhan “Shorty”, a Microtrains GP35, an AZL GP9, and an AZL F59. Each of which I am considering as candidates for mechanisms for the layout. I used several Microtrains Nn3 boxcars for to test the ability of the mechanisms to push and pull trains up the helix.

Unfortunately, the results were not very satisfactory. The “Shorty” was able to only move 1 car at a time reliably up the helix. The other three mechanisms were able to reliably move three cars each up the helix. None were able to move my target of five cars, and none were even able to move four. Three cars is simply not satisfactory, particularly since the helix will be a major obstacle in the layout. Furthermore, I found that in the event of an uncoupling, the trains would rapidly accelerate down the helix and given the tight curves at the ends, the resulting derailment was inevitable and typically were catastrophic. It became clear that the helix was just too tight, too steep and in this case, too inaccessible to satisfy my operational desires. If it were not for the combination of tight curves and steep grades, the helix was more workable. It is clearly the combination that is the problem.

This is a show stopper in my mind. So, the helix is out. Fortunately, the solution appears to be fairly obvious too. The car ferry could be used as the means of connection between the decks, much as Mark Dance does on his Columbia and Western for his branchline operations. But, that will take some redesign work on each deck to make it work a bit better. The lesson to be taken here is that critical elements in a plan need to be tested and confirmed as being viable. I should have tested out the helix concept sooner, and certainly before completing the entire track plan. Based on the erroneous assumption that the helix was viable, I designed in similar curve and grade conditions in other parts of the layout design. These need to be addressed as well in the revisions.

Cameron Turner

Thursday, July 4, 2019

Adding a Twist…

The helix is a critical element to the plan for the layout, so its design was one of the driving factors in the configuration of the layout. The purpose of the helix is two-fold. First, it is intended to connect the various “exits” from the modeled layout to the various staging yards. Second, because I desire to make the layout as close to self-staging as possible (so as to minimize the effort required between operation sessions), the helix provides a continuous loop option between the ends of the layout. Because of the grade of the layout and its multiple deck nature, this means that the helix could become quite a bottleneck, which has led me to double track the helix for most of its length.

Helix Diagram.

And its length will likely be substantial. Exiting the layout near Prospect Junction, I am predicting that the upper entrance of the layout (modeling somewhere west of Tabernash, Colorado if all goes well) will be around 37.5-inches above Prospect Junction. With a target climb per lap of the helix of 2.5-inches, this means that there will be about 15 laps in the helix. That is a lot of track, and it will need to be pretty much bullet proof.

So, where do these numbers come from? Well, let’s take a look at how I came up with 2.5” for a lap of the helix. I plan on laminating the helix sub-roadbed together using two layers of 1/8-inch wood with any joints staggered. This gives me a 1/4-inch thickness. Add to that an 1/8-inch thick cork roadbed, and another 1/8-inch thickness for the track and that gets me to a total of ½-inch thickness. NMRA Recommended Practices suggest that a in N-scale, 1 23/32-inch is necessary over the railheads. I round this up to 2-inches to give me a little wiggle room. And there we go, 2.5-inches. This also similar to the MRVPCanadian Canyons layout railhead-railhead height in their helix. I’ve previously commented on that layout and its inspirations to my own efforts. It is well worth the cost of an MRVP subscription to watch this excellent series.

Model Railroaders Canadian Canyons Layout showing their completed helix.
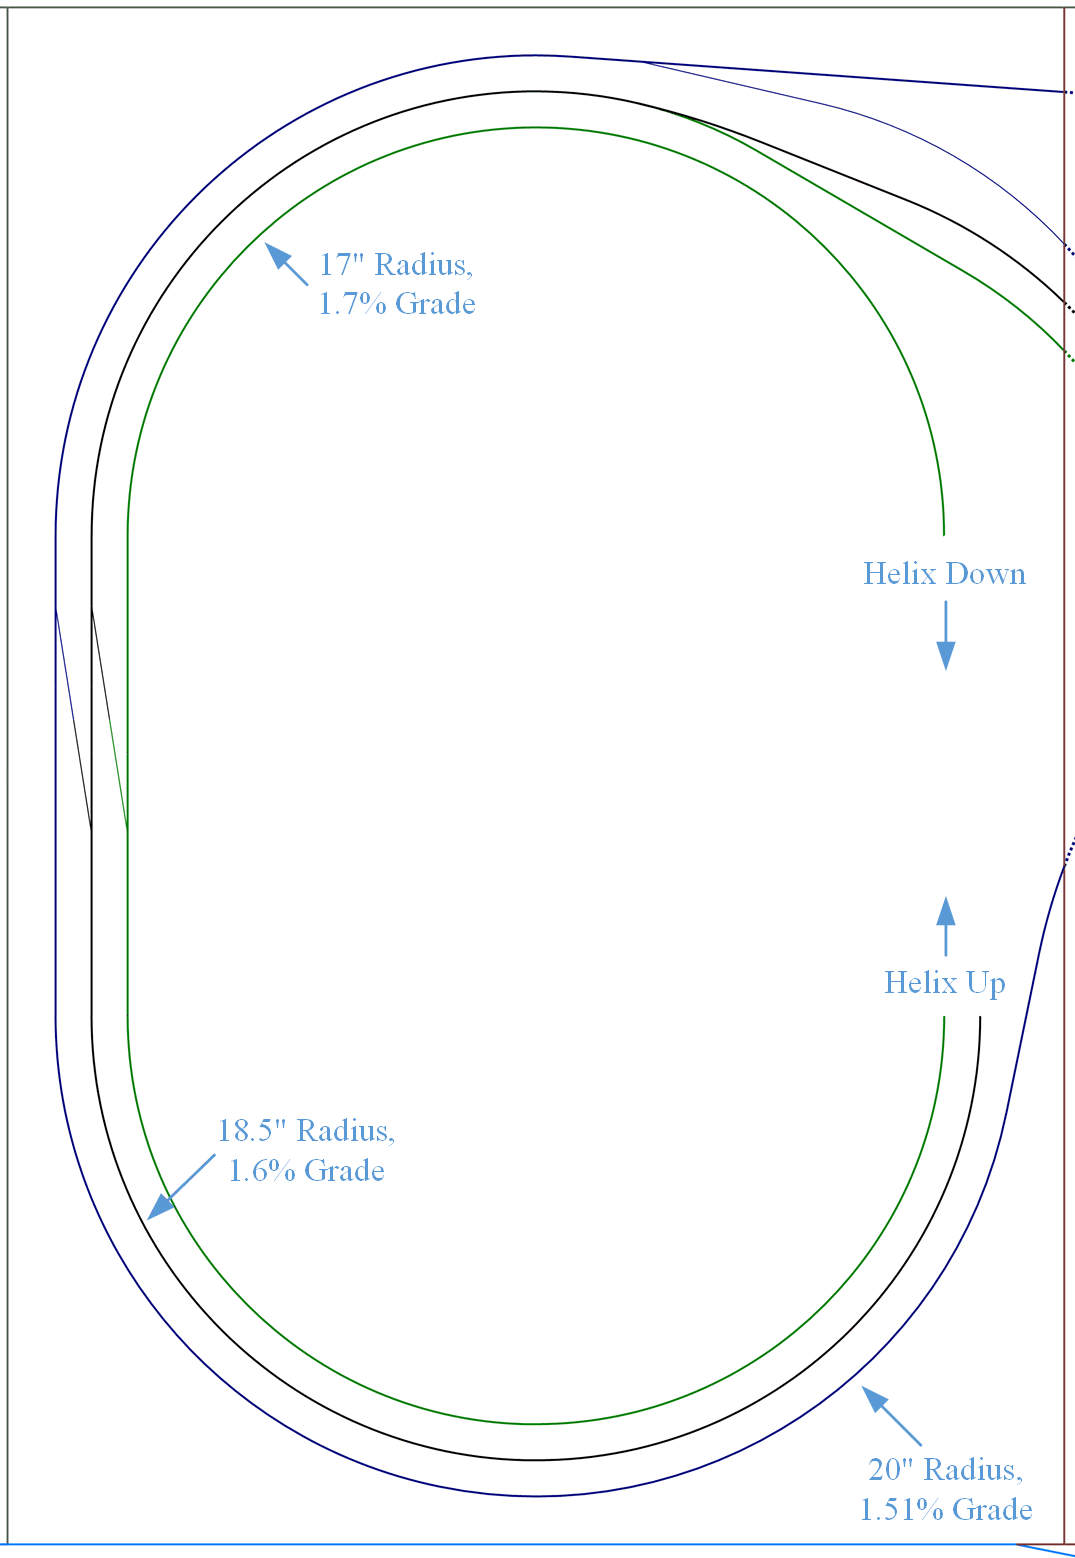
My design has as many as 3 loops of track in the helix. The loops will have 1.5-inch spacing, consistent with Ntrak standards, and more generous than I am going to use in the rest of the layout. The inner loop will have a 17-inch minimum radius, the middle loop will have a 18.5-inch minimum radius, and the outer loop will have a 20-inch minimum radius. Unfortunately, the purpose of the outer loop is often for activities other than climbing the helix, but I’ll explain more in a future helix design post. However, radius is a major concern. Fortunately, I do have some data to work with here. MRVP used a helix with 16.5-inch and 18.5-inch radius curves and a lap-over-lap rise of 2 3/16-inches. (David Popp says it is only 2-inches in the videos on the layout, but he left out the thickness of the subroadbed in his calculations.) This results in a grade of 2.1% on the 16.5-inch radius inner loop and 1.9% on the 18.5-inch outer loop. MR regularly runs trains of 18-22 cars with 2 engines up these grades without issue.

Layout Main Helix Design
This compares well with my design. I have 17-inch to 20-inch radius curves, so my performance should be in the same ballpark as that of Canadian Canyons. However, because my helix is an oval instead of a circle, I get two benefits. First of all, in order for a train to have cars on the entirety of both curved ends of the helix, it would need to have at least 35 50’ cars, and then only 30 of the cars would be on the curved sections. Part of my grade is handled with straight sections which will have less rolling resistance. Second, because my helix is an oval, I get a larger lap to gain elevation due to the two 20-inch straight sections. The result is that my helix has grades of 1.7% (inner loop), 1.6% (middle loop) and 1.51% (outer loop). Thus, I should exceed the performance of the trains that is achieved in the Canadian Canyons loop with the same clearances and a slightly more substantial (by 1/16-inch) subroadbed.


Based on some experimentation, I’ve targeted a “long” unit coal train of approximately 36 cars with the possibility of a caboose and 3 engines in the helix. On the layout, the train would generally run with 2 additional swing helper engines per DRGW practices. I want to do some testing of my own, but I expect that I will be able to achieve these train lengths using this number of locomotives based on the Canadian Canyons layout. One last point, most of the time, I plan to use the inner loop as the downward loop, and the middle or outer loop as the upward loop, which will further minimize the grades. Indeed, it is on the visible layout where grades of 2%+ will be faced by the trains on the mainline where the ruling grades will lie.

One last note: A Happy Fourth of July to everyone reading this blog and to those who have not yet found it. Take some time out to celebrate this country. Remember, this is a celebration of a common dream, not of any one person, place or thing. It is instead about America’s story, about our collective story as a nation, and that belief that has allowed people to make sacrifices to provide others with a chance to experience this dream. No one person is bigger than that story. That is why the story lives on and on and on. Live the story. Pursue the dream. Share the dream with those who are most in need of a dream. It is how the dream lives in each of us. Never surrender your dreams.

Cameron Turner