

The helix is a critical element
to the plan for the layout, so its design was one of the driving factors in the
configuration of the layout. The purpose of the helix is two-fold. First, it is
intended to connect the various “exits” from the modeled layout to the various
staging yards. Second, because I desire to make the layout as close to
self-staging as possible (so as to minimize the effort required between
operation sessions), the helix provides a continuous loop option between the
ends of the layout. Because of the grade of the layout and its multiple deck
nature, this means that the helix could become quite a bottleneck, which has
led me to double track the helix for most of its length.
 |
| Helix Diagram. |
And
its length will likely be substantial. Exiting the layout near Prospect
Junction, I am predicting that the upper entrance of the layout (modeling
somewhere west of Tabernash, Colorado if all goes well) will be around 37.5-inches
above Prospect Junction. With a target climb per lap of the helix of 2.5-inches,
this means that there will be about 15 laps in the helix. That is a lot of
track, and it will need to be pretty much bullet proof.
So,
where do these numbers come from? Well, let’s take a look at how I came up with
2.5” for a lap of the helix. I plan on laminating the helix sub-roadbed
together using two layers of 1/8-inch wood with any joints staggered. This
gives me a 1/4-inch thickness. Add to that an 1/8-inch thick cork roadbed, and
another 1/8-inch thickness for the track and that gets me to a total of ½-inch
thickness. NMRA Recommended Practices suggest that a in N-scale, 1 23/32-inch
is necessary over the railheads. I round this up to 2-inches to give me a
little wiggle room. And there we go, 2.5-inches. This also similar to the MRVPCanadian Canyons layout railhead-railhead height
in their helix. I’ve previously commented on that layout and its inspirations
to my own efforts.
 |
| Model Railroaders Canadian Canyons Layout showing their completed helix. |
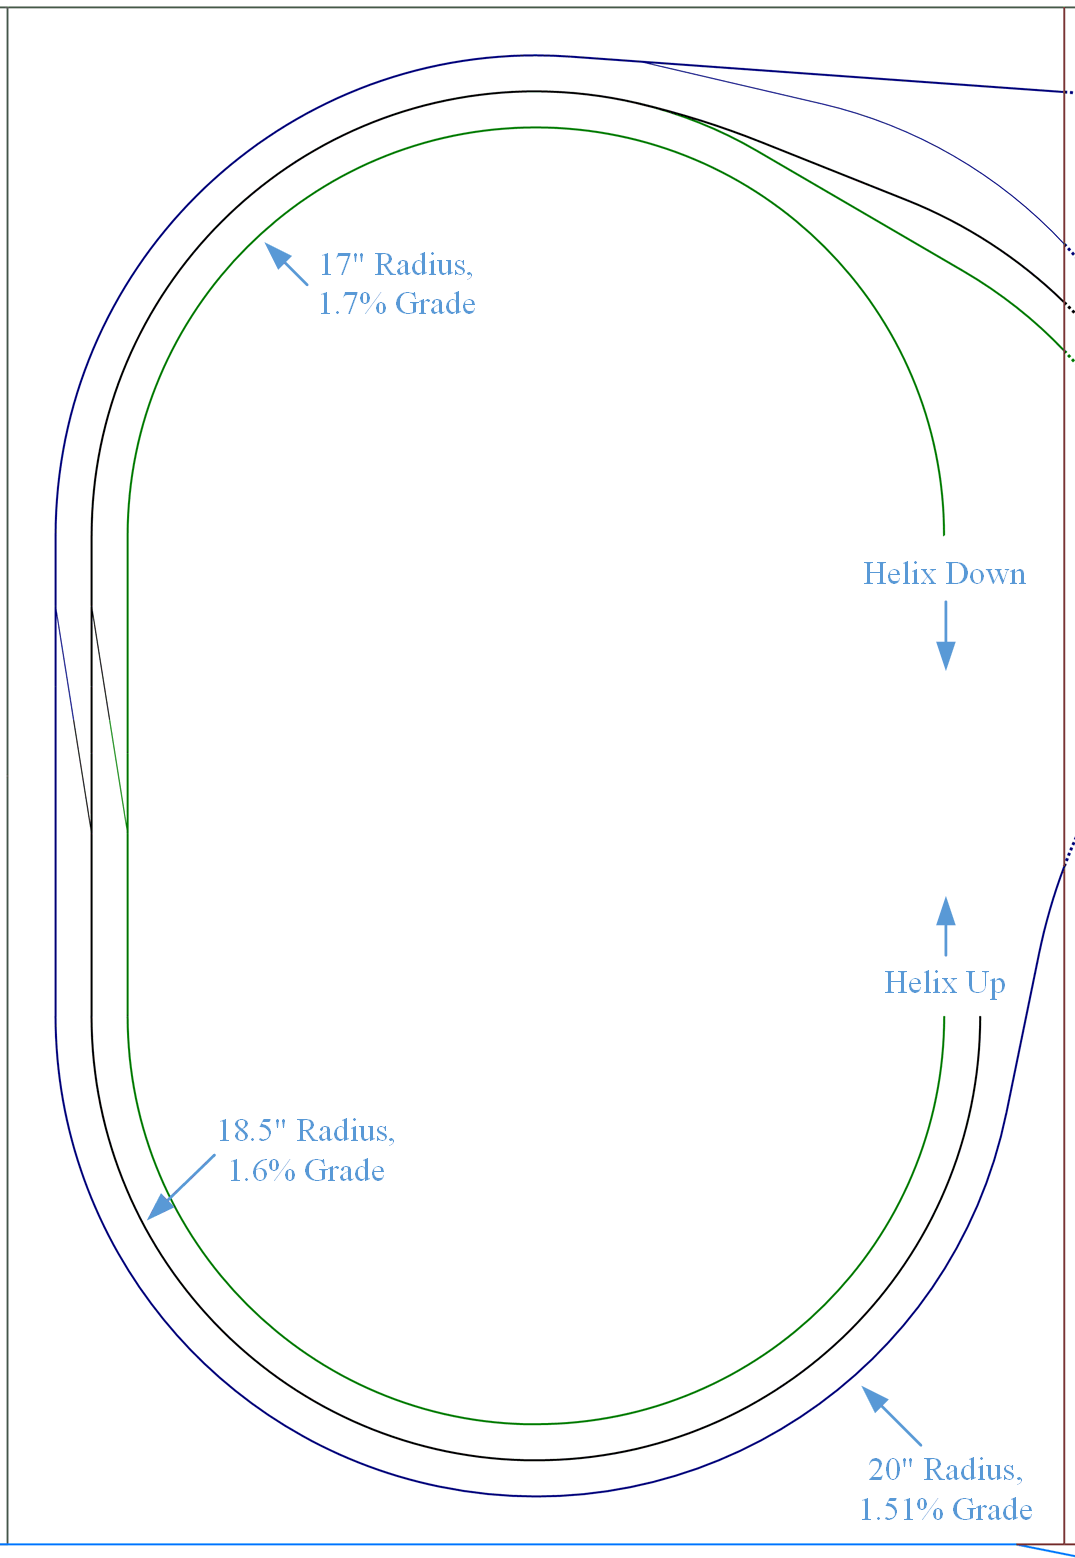
My design
has as many as 3 loops of track in the helix. The loops will have 1.5-inch
spacing, consistent with Ntrak standards, and more generous than I am going to
use in the rest of the layout. The inner loop will have a 17-inch minimum
radius, the middle loop will have a 18.5-inch minimum radius, and the outer
loop will have a 20-inch minimum radius. Unfortunately, the purpose of the
outer loop is often for activities other than climbing the helix, but I’ll
explain more in a future helix design post. However, radius is a major concern.
Fortunately, I do have some data to work with here. MRVP used a helix with
16.5-inch and 18.5-inch radius curves and a lap-over-lap rise of 2 3/16-inches.
(David Popp says it is only 2-inches in the videos on the layout, but he left
out the thickness of the subroadbed in his calculations.) This results in a
grade of 2.1% on the 16.5-inch radius inner loop and 1.9% on the 18.5-inch
outer loop. MR regularly runs trains of 18-22 cars with 2 engines up these
grades without issue.
 |
| Layout Main Helix Design |
This
compares well with my design. I have 17-inch to 20-inch radius curves, so my
performance should be in the same ballpark as that of Canadian Canyons.
However, because my helix is an oval instead of a circle, I get two benefits.
First of all, in order for a train to have cars on the entirety of both curved
ends of the helix, it would need to have at least 35 50’ cars, and then only 30
of the cars would be on the curved sections. Part of my grade is handled with
straight sections which will have less rolling resistance. Second, because my
helix is an oval, I get a larger lap to gain elevation due to the two 20-inch
straight sections. The result is that my helix has grades of 1.7% (inner loop),
1.6% (middle loop) and 1.51% (outer loop). Thus, I should exceed the
performance of the trains that is achieved in the Canadian Canyons loop with
the same clearances and a slightly more substantial (by 1/16-inch) subroadbed.
Based
on some experimentation, I’ve targeted a “long” unit coal train of
approximately 36 cars with the possibility of a caboose and 3 engines in the
helix. On the layout, the train would generally run with 2 additional swing
helper engines per DRGW practices. I want to do some testing of my own, but I
expect that I will be able to achieve these train lengths using this number of
locomotives based on the Canadian Canyons layout. One last point, most of the
time, I plan to use the inner loop as the downward loop, and the middle or
outer loop as the upward loop, which will further minimize the grades. Indeed,
it is on the visible layout where grades of 2%+ will be faced by the trains on
the mainline where the ruling grades will lie.
One
last note: A Happy Fourth of July to everyone reading this blog and to those
who have not yet found it. Take some time out to celebrate this country.
Remember, this is a celebration of a common dream, not of any one person, place
or thing. It is instead about America’s story, about our collective story as a
nation, and that belief that has allowed people to make sacrifices to provide others
with a chance to experience this dream. No one person is bigger than that story.
That is why the story lives on and on and on. Live the story. Pursue the dream.
Share the dream with those who are most in need of a dream. It is how the dream
lives in each of us. Never surrender your dreams.
Cameron Turner
No comments:
Post a Comment