

 |
| Eastbound CSDU Unit Coal Train entering the Moffat Tunnel on April 22, 1995. Photo by HardhatMak. |
Cameron Turner
|
| Eastbound CSDU Unit Coal Train entering the Moffat Tunnel on April 22, 1995. Photo by HardhatMak. |
 |
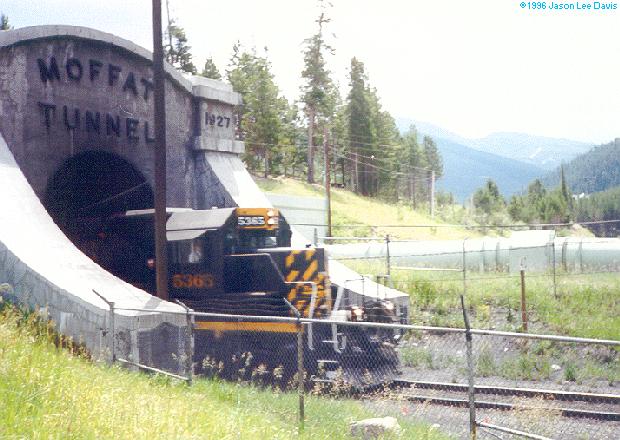
| DRGW5365 Emerges from the Western Portal of the Moffat Tunnel in 1996. Photo by Jason Lee Davis. |
Cameron Turner
 |
| An SP Patch (UP6361) leads two more UP units west towards Fraser, Colorado. Photo by John Crisanti. |
In Part 3, we ended with the reveal that our fifth job called was to be the Table Job, which would be our first job to repeat so far in the operating session. So, what are the rules about repeating jobs?
It is desirable for jobs to repeat at some frequency on the branch. After all, there is a finite amount of work, and some jobs need to happen more often than others. However, I did not want jobs to repeat to regularly. Back-to-back identical jobs for instance would not generally make sense. So, I incorporated two job history lists in the system. The first is a short history that says that no job can occur again in less than four cycles. So, we could have had the table job occur in place of the McIntyre Job, but no sooner. The second history is a long history which prevents certain tracks from being worked more than once a shift, such as the team track. Both of these parameters can be varied, but I think the short history works very well at a length of 4. The exception is the McIntyre Job, which can occur more often because it is actually 2 different jobs, McIntyre A and McIntyre B.
So, at this point, we have once again drawn a Table Job, but in this case as luck would have it, we have 8 cars in the job this time. So, here is the job, ready to depart East Yard.
 |
| Table Job ready to Depart East Yard. |
And here is the job ticket for the table job this time.
 |
| Job ticket for the second occurrence of the Table Job. |
Once again, we have to update the work at the Brewery.
 |
| Brewery Status when the second Table Job Arrives. |
In this case, we produce 4 loaded cars from cars already on the Table tracks, 3 more loads from cars we brought to the tables, and one car which we pick up from the Keg track. There are two more cars on the Keg track ready to pick up, but we are limited to 8 cars on the train. Thus, the Brewery looks like this when we are finished.
 |
| Brewery Status after the second Table Job. |
The train returns to East Yard and delivers its 8 loads to the Departure Track. The Departure track is now full, and is ready for an arriving interchange train from the Golden Branch.
 |
| East Yard after the Second Table Job Returns. |
This incoming interchange train will drop off new cars to be sorted in the East Yard and collect the departing cars collected from the Coors Branch.
 |
| East Yard with an arriving interchange train from the Golden Branch. |
Meanwhile, work continues, and the next job randomly selected is the Table Job again. Since the Table Job was just run, the system randomly selects another job, and so the Receiving Job got pulled, with this Job Ticket.
 |
| Job Ticket for the Receiving Job. |
The Receiving Job is assigned five cars from East Yard and prepares to depart for the Receiving Plant.
 |
| Receiving Job Ready to Depart East Yard. |
Once again, work is performed around the layout and so the Receiving Plant status looks like this when the Receiving Job arrives.
 |
| Receiving Job arriving at the Receiving Plant. |
The receiving job spots its five cars and pulls 8 empties from the Receiving Plant before departing back to East Yard.
 |
| Receiving Job departing the Receiving Plant |
The job returns to East Yard, and uses these cars to begin to assemble the next departing Beer Train.
 |
| Receiving Job Returns to East Yard |

 |
| After Switching McIntyre Yard, the McIntyre Job is ready to depart for the Brewery. |
 |
| Arriving with cars for the Brewmaster Track #1. |
 |
| Ready to depart the Brewery for McIntyre Yard. |
 |
| End of the McIntyre Job (type B). |
I finally got around to putting together the brief video I shot of the T gauge Layout I have been building for the CRMHA and show each year at the Central Train Show in February. You can see some of the related posts here.
The end of the video also shows the new 120mm Radius Concrete Viaduct that I have offered through ModelWorks. There is already a 132.5mm Radius version, so there are now two options for the T gauges out there.
I have a number of additional project en route for both ModelWorks and for this little T gauge gem. I particular, I am interested in the rumored new turnout that may be available in December? At least I hope so. COVID-19 has a couple of other projects delayed.
Cameron
 |
| Am abandoned trestle on the original Moffat Line above Winter Park. The old Denver and Salt Lake Mainline touched the top of the world on this route. Photographer Unknown. |
The fires in California have ravaged a lot of land and property. But I heard the other day that they have claimed a railroad that is closer to my heart. My mom attended Cal Poly, and they have a 1/3rd scale railroad, the Swanton Pacific Railroad. Unfortunately, the fires claimed 3 of the four engines and numerous cars and railroad structures.
 |
| Damage to the SP locomotives. |
They are raising money to restore the railroad. If you would like to donate, please use this link. I made a donation in memory of my mother earlier today.
Cameron Turner
 |
| A Blizzard in the High Country of Colorado on the Moffat Line. Photographer Mike Danneman. |
At the end of Part 2, we had performed the Table Job and had brought the loads generated by that job back to East Yard. The next job randomly selected is the Heavy Beer Job. Now, the jobs are not equally likely. The probabilities of each job are shown below:
 |
| Coors Job Probabilities. |
Note that the East Yard Job is not included, as I intend for it to be a ongoing job, or if there is only one crew operating the branch, then switching East Yard becomes a standard job before/after each job.
Last time, I also forgot to include the paperwork generated by the program, or the "job ticket" or switchlist for each job. Here is the Job Ticket for the Table Job performed last time.
 |
| Job Ticket for Table Job. |
When implemented, I intend for the Table to be controlled with an Arduino at the Brewery using a traffic light system like that used at Coors. A green light on the table spot indicates that the table spot is a fully loaded car. A yellow light will indicate a partially loaded car and a red light indicates that the car is loading. Once a switching move is completed, the operator will push a button which will lead to a change in the lights within a short time period (i.e. 30 seconds) indicating that the next move has been determined. The Arduino would indicate the Keg track location for any partially filled cars.
As of the end of the Table Job, the current status of East Yard is shown below:
 |
| The Heavy Beer Job ready to Depart East Yard. |
In this case, the Heavy Beer Job will run with only two Coors Tank cars dedicated to this service.
 |
| Coors Tank Car used in Concentrated Beer Service. Photo by Lionel Trains. |
Since a new job has been initiated, we update the status of cars being worked around the layout. The changes to the Brewery area are shown below.
 |
| Updated Status in the Brewery Area. |
So, the Heavy Beer Job has arrived in the Brewery area (Top Center) and we can see that the two yellow cars are now loaded, and the two cars with yellow outlines are now unloaded. Since all seven cars on the Heavy Beer Track are now loaded, they will be collected and returned to East Yard.
 |
| Heavy Beer Job ready to return to East Yard. |
Upon returning to East Yard, the Heavy Beer Job will add those cars to a departing train for interchange.
 |
| Heavy Beer Job returning to East Yard. |
So, in this case, only 2 cars were spotted on the branch while seven cars have been removed. So, we have pulled 12 cars and spotted 8. So, while after 1 job we were spotting more cars than we pulled, now we are pulling more cars than we spot. But these are the natural fluctuations I desire to see on the branch, as long as they balance each other out over time.
The job ticket for this job looks like the following.
 |
| Heavy Beer Job Job Ticket. |
With this job completed, the next job randomly selected turns out to be the Brewery Service Job. In this case, we once again simulate and update the loading/unloading status around the layout, and note that on the last job cycle, one of the cars whose status changed was the car at the Waste Treatment Spur located off East Yard. This spur is served by the Brewery Service Job, in addition to spurs located at the West end of the Brewery Complex. In fact, since this is the first time that this job has been run during the shift, we also allow the job to work the Brewery Team Track. To allow time for loads to be placed/removed from cars in the team track, I only allow this track to be worked once every shift of the Brewery. A shift is currently defined as 25 jobs. This value can be adjusted so that the team track is generally worked only once per operating session.
At the beginning of this job, East Yard looks like the following:
 |
| East Yard at the Start of the Brewery Service Job. |
The train length was randomly determined to be eight cars. Analysis of the spurs to be worked indicated that there are 5 cars ready to be picked up and 10 total spotting locations available. Had there been less than 8 spotting locations available, then the train length would have been limited to what was available.
Before leaving East Yard, the Brewery Service Job will work the Waste Treatment Spur.
 |
| Working the Waste Water Treatment Spur. |
The car picked up from the Waste Treatment Spur would be immediately delivered to the departure track as there is no reason to haul the car around the brewery. Consequently, a 7 car train departs East Yard.
 |
| Departing East Yard. |
Most of the work to be conducted occurs near North Yard, which will look like this upon the arrival of the Brewery Service Job.
 |
| Brewery Service Job working the North Yard Area. |
Notice that one of the tasks here is to refill the coal track serving the rotary dumper. This track takes three cars, but only two have been brought in the train. Not a problem though as extra cars are on standby in North Yard. These cars handle either overflow hoppers or will provide additional hoppers to this track. In this model, this is the purpose of North Yard.
 |
| North Yard Switching Complete. |
The remaining three tanks cars are destined for the Caustic track at the Packaging Plant. This track appears on the Brewery Area portion of the schematic.
 |
| Brewery Area to switch the Caustic Track. |
Here, we switch out the empty tank car and replace it and the two empty spots with loaded tank cars.
 |
| Work Complete - time to head back to East Yard after organizing the train at South Yard. |
We would them run back to South Yard and use the run-around track there to organize the train before returning to East Yard.
 |
| Brewery Service Job Returns to East Yard. |
Back at East Yard, we place our collected cars in the departure track and complete the Brewery Service Job. The job ticket looked like this.
 |
| Brewery Service Job Ticket. |
At the end of the job, East Yard now looks like this.
 |
| East Yard after the Brewery Service Job. |
Once again, a job is randomly selected, and this time the McIntyre Job is pulled from the list. The associated job ticket looks like the following.
 |
| The McIntyre Job Ticket. |
The McIntyre Job works in two different ways depending on the status of the cars at the elevator. In this case, the cars at the elevator are interchanged hoppers, which were delivering grain to the elevator. This job will replace those three hoppers with intraplant Coors Hoppers, and will take three new loaded hoppers to the McIntyre Yard. When this small three car train arrives, McIntyre Yard looks like this.
 |
| McIntyre Yard when the McIntyre Job Arrives. |
 |
| McIntyre Yard after the switching is completed. |
 |
| Returning to East Yard after the McIntyre Job. |
 |
| East Yard after four jobs have run. |
In Part 1, we looked at the different jobs operated on the Coors Branch. Today, I want to describe how these jobs will be selected and how I built a simulation of the operations of my Coors Branch. Rather than look at the track plan, I think today we will focus on the schematic of the branch line.
 |
| Schematic View of the Coors Branch. |
Generally, operations start at the East Yard with the East Yard Job. The East Yard Job would sort cars in East Yard, break down trains arriving from the Golden Branch or from other jobs on the Coors Branch, and build trains for Coors Branch Jobs or to be interchanged back to the Golden Branch. Occasionally, cars arriving at East Yard may also be bad ordered and sent to the RIP track for a period of time.
When a Coors Branch Job is needed, a computer system will update the status of cars previously spotted on the branch. For each job, there is a probability for which each car in a particular job location of the layout have changed state (i.e. loaded-to-unloaded or unloaded-to-loaded) since the last job was initiated. The probabilities for each individual car being worked are shown in the table below.
 |
| Work Probabilities by Regions of the Coors Branch. |
These probabilities could be individually tuned so as to prevent work from being completed too quickly (generating too many cars from the sidings) or too slowly (clogging the sidings with cars in process). Thus, the program determines what cars are ready to be returned to East Yard for interchange.
With the number of cars that are ready to be returned from the job site identified, these spots and any unoccupied spots are considered as possibilities for new cars to be delivered from East Yard. The program then randomly determines the exact size of the train within the limits specified by the job and which spots will receive cars from East Yard. Based on those locations, the program then determines the type of car needed. If a track can receive different types of cars, the appropriate type is determined randomly. If it is available in East Yard, it can be sent, otherwise the East Yard Master will need to request that car from the next Beer Train and place a hold on that delivery meaning that the car is delivered the next time that job is called after the car is delivered to East Yard.
Any empties currently in the spots for the deliveries must be picked up and returned to East Yard by the Job, and those cars are assigned by the program to the job ticket. Any remaining space space on the job ticket is then filled by the program with additional cars on that job waiting for pickup if any.
Let's look at an example. Initially, East Yard looks something like this:
 |
| Initial East Yard Configuration. |
The engine Coors 993 (black box with red outline) is assigned a train of 6 empty refrigerated cars (RP), on East Yard Track 02. East Yard is populated with a bunch of cars, some loads (black outlines) and some empties (no outline). The job assigned is the Table Job which will work the Tables at the Brewery. Initially, this area of the layout looks like this:
 |
| Initial distribution of cars at the Brewery. |
Again, cars that are empty have no outlines, partially loaded cars have a dashed outline, and loaded cars have a solid outline. The red cars are Coors dedicated cars, while the blue cars are interchange cars. After the job is assigned, work is simulated throughout the Coors complex. As a result, the status of several cars in this area of the layout update (as do cars in other part of the layout).
 |
| Brewery cars after the first work update prior to the Table Job starting. |
You see four cars in this area of the layout that update. One car on Brewmaster Track #2 is unloaded (Yellow Outline). In addition, on car on the Keg Track, the Heavy Beer Track, and the Transload Track are loaded in this period (Yellow Filled Cars). Now the Table Job arrives, and begins to work the table. The first table position to finish loading is Table 7, which actually produces a partially loaded car which needs to be transferred to the Keg Track, position C.
 |
| Keg Table 7 produces a partially filled car. |
An empty RP car from East yard is placed on Table 7, the partially filled car from Table 7 is sent to the Keg Track, Position C, and the Loaded car from Position D of the Keg track is stored on the Table Spur in Position A. This looks like:
 |
| Completed moves from the first Table move. |
With these moves made, the Table then finishes loading Table position 1 (with a fully loaded car this time), which is then replaced with an empty RP car from East Yard.
 |
| Completed moves from the second Table move. |
The third table move is a fully loaded car in Table 9. Again, it is switched for an empty car.
 |
| Completed moves from the third Table move. |
The fourth table move is a partially loaded car on Table 5. This car is moved to the Keg Track, Position F.
 |
| Completed moves from the fourth Table move. |
The fifth table move is the generation of a fully loaded car from Table 3.
 |
| Completed moves from the fifth Table move. |
The sixth Table move is the completion of the loading of the car in Table 7, which was delivered earlier in the Job. The Tables are actually randomly ordered, with some guidelines that prevent a Table from being filled in one turn and fully loaded immediately. But the same Table spot can be served more than once during the job.
 |
| Completed moves from the sixth Table move. |
At this point Coors 993 would then take the train from the Table Spur and haul the train back to East Yard.
 |
| Table Job ready to return to East Yard with five loaded cars. |
Arriving back at East Yard, the cars would be delivered to a departure track. East Yard would be switched to put these cars in an appropriate order for interchange, and based on the next job called, an appropriate train would be assembled in East Yard.

I'll pick up this operation in the next post on the subject. So far, we have transferred 6 empties into the layout, and pulled 5 cars out ready for interchange. Ideally, we want the number of cars in and out of the layout to be the same, otherwise the branch will eventually be empty or it will be completely full of cars. Neither of which is desirable. Can we determine if the incoming flow is balanced with the outgoing flow.
Cameron Turner


