Sunday, November 10, 2019

A Momentary Aside - A little HOn2z Progress

Sometimes, even the best plans go amiss. Yesterday, was the NMRA Palmetto Division of the NMRA fall meeting. I had planned on going, but a combination of a tweeked back and not feeling particularly well led me to pass on the meeting.

One of my goals, going back even before my surgery has been to earn my Master Model Railroader (MMR) certification. Not because I feel the need to demonstrate my skills, but as a means of improving them. While I primarily model in N-scale, I dabble in Z, T and in HOn2z (2' gauge, HO scale using Z-scale track). And I cannot confirm or deny the presence of some On30 in my basement either. But it is the HOn2z that I am taking an aside to discuss today.

I had been thinking about bringing my HOn2z projects tot he meeting to show, but alas, I do not have things at a point where I want to show them yet. Most are incomplete, but I thought I might preview a couple of pictures.

Gilpin Gold Tram Ore Car.
 Most of my efforts are focused towards the Gilpin Gold Tram, a 2' gauge line that ran out of Central City and Blackhawk, Colorado.  Despite being HO scale, the cars are similar in size to N-scale cars, and they ride on Z-scale trucks and track. The cars are all being 3D printed and then I am assembling them and finishing them. The ore car above has just had the two cross bars that connected to the chains the connected to the doors of the ore car. There is still some work to be done, but the car is making progress.

Gilpin Rail Car.
The latest car to get started is this Gilpin rail car. Basically an open frame used to move sections of rail and steam boilers along the line, I printed this car primarily in brass to get sufficient weight on the car.

More of the fleet.
And the rest of the fleet. There is a water car (upper left), a stake bed flat car (left), 2 more typed of ore cars (middle), a gondola (upper right) and several flat car frames are all under construction. It is nice to have something to do when I do not want to work on planning, and maybe this will even lead to yet another little layout project. Stay tuned!


20 days to go. 20 Posts to go!

Cameron Turner

Saturday, November 9, 2019

Tunnels 2, 3, 4, and 5

Finally, we get back to new trackage. I'm pretty happy with the potential of the new benchwork configuration, so the plans from here on out, use that configuration as their basis.

Just to the west of Plain siding, we hit the Flatirons portion of the Tunnel District. The Tunnel District itself contains 28 tunnels in 17.1 miles. Tunnels 2 to 29 includes 26 tunnels in about 10 miles, which is one of the highest concentrations of tunnels in America.

Two tunnels are now defunct, Tunnels 9 and 28, and the two tunnels at either end of the tunnel district, Tunnel 1 and Tunnel 30 are both isolated from the rest of the district. The rest of the Tunnel District can be divided into three regions. The first region is Tunnels 2-8, which comprise what I call the Flatirons Region of the Tunnel District. Tunnel 8 is the dividing line between the Flatirons Region and what I call the Middle Region, which extends to Tunnel 18 and Crescent Siding. The Middle Region lies along South Boulder Creek, although for the entire run through this region, the creek lies a considerable distance away from and below the railroad. Beyond Crescent Siding, the Upper Region of the Tunnel District, Tunnels 19-27 and Tunnel 29, lie much closer to South Boulder Creek and even run along the creek itself.

Tunnels 2, 3 and 4 in the Flatiron Region of the Tunnel District. Photo from Chuck Conway's Heart of the Rockies.
This scene has been similarly captured by Mike Danneman in his layout.

Tunnels 2, 3 and 4 on Mike Danneman's Layout.
Physically, there is a short separation of single track between Plain siding and Tunnel 2. I wanted to capture that in the plan. Immediately after Tunnel 2, the line sweeps across Bull Gulch on a massive fill. Bull Gulch washed out in October 2013.

DRGW 5390 climbs WB out of Tunnel 2 and across the fill at Bull Gulch. Photo from Chuck Conway's Heart of the Rockies.
Bull Gulch Washout, October 2013 from Below.
Bull Gulch Washout, October 2013 from Above.
After crossing the fill across Bull Gulch, there is a cut through a protruding flatiron slab and then the line enters into Tunnel 3.

East portal of Tunnel 3 with DRGW 3123 and 3156 headed westbound in 1991. Photo from Rio Grande Secret Places, Volume 1 by R.C. Farewell.
Tunnel 3 is often described as a slot through the Flatirons.Tunnel 4 is quite similar, but the west portal emerges from a substantial flatiron formation that leaves much of that portal in shadow. Photos are difficult to come by but some do exist.

West portal of Tunnel 4 with SP9731 leading a passenger special west. Photo from Rio Grande Secret Places, Volume 1 by R.C. Farewell.

East Portal of Tunnel 5 presents another penetration of the iconic Flatirons southwest of Boulder, Colorado. Photo from Rio Grande Secret Places, Volume 1 by R.C. Farewell.
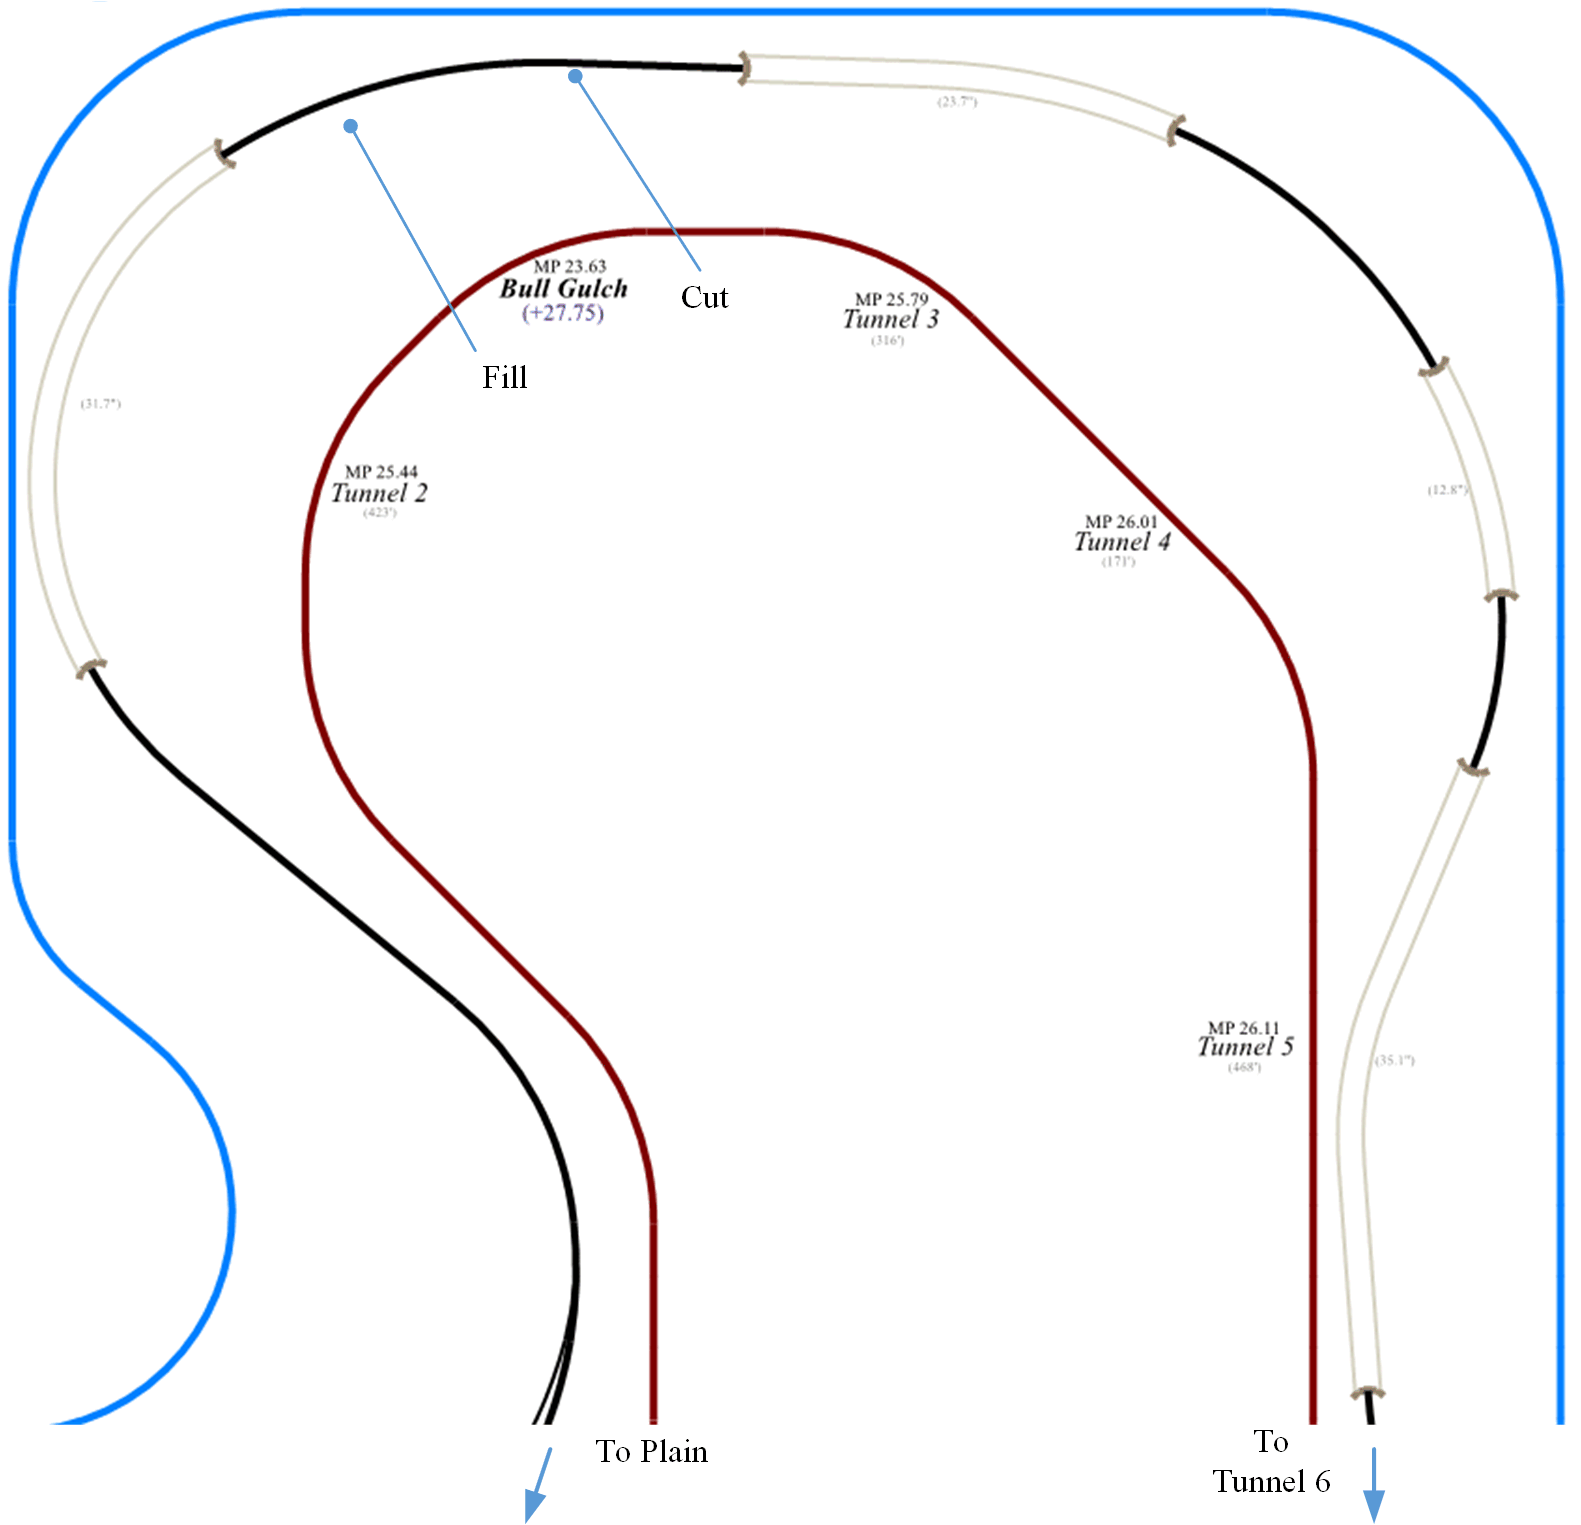
So, with all of these iconic images through the Flatirons in mind, I have put together the following track plan that brings the mainline off the second peninsula and along the wall above Leyden Siding.

Track Plan for Tunnels 2-5 through the Flatirons.

So, in this plan, I have a short section of single track between the west end of Plain, and the east portal of Tunnel 2. Tunnel 2 with a length of 31.7", bends around the corner, and the curve continues across the fill of Bull Gulch (over a 33" radius). The mainline cuts through a slab of the flatiron formation, and then the main plunges into Tunnel 3 for another 23.7". These both seem to be long tunnels, but both are proportional to the actual tunnel lengths, as it the spacing between them. Those proportions are continued throughout the Tunnel District. After another brief appearance, the line enters Tunnel 4 for 12.8", appears again along a 21" radius curve (instead of a tangent as in the prototype) before plunging into Tunnel 5 for the next 35.1". Most trains will be continuously playing peek-a-boo during the transit through this part of the layout.

In the plan, I show the tunnel portals, and the width of the tunnel itself. I've hidden the track centerline itself in the plan above. The train continues its climb from Plain (at 26.5") to the west portal of Tunnel 5 (at 29.3"). The entire scene is 17' long, and the resulting grade is about 1.3% which should be enough to be noticeable, but should not be a severe operational impediment. The ruling grade remains out in the open through the Big 10 curves. I think that the scene will be both impressive and immersive in its effect. I am excited about seeing it in reality.


21 Days to Go. 21 Posts Remaining.

Cameron Turner

Friday, November 8, 2019

Re-Viewing Plain

I had previously arrived at the siding of Plain on the earlier plan. However, once I realized that the location of Plain would be directly above the Chem Spur area on Deck 1, and right behind Plain on the opposite side of the aisle would be C&S Junction on the lower deck, and Pinecliffe would be directly above Plain. In addition, the support post in the area complicates the aisle size. In short, I could envision that there was going to be a problem in that aisle.

Original Plain Siding Track Plan.
The reconfigured benchwork footprint, places Plain in a different configuration on a shorter peninsula. To maintain the relative length of Plain siding, the siding will need to be a lot less linear. This is not all bad. Plain is fairly linear on the east end, but the west end does curve around a bit as the line approaches Tunnel 2. With the new benchwork configuration, I was able to arrive at this track configuration.

Revised Plain LDE.
The resulting plan for Plain siding is fairly linear on the east end (near Tunnel 1), but not quite as much as is the prototype. Still, it is fairly reasonable.

WB Train at the east end of Plain siding.
Towards the bottom left hand corner of the plan, the siding will bend around to penetrate Rainbow Cut, a very colorful rock cut in the area. This curve is a bit more extreme than the real location, but again, it is necessary and an acceptable compromise.

DRGW5390 Eastbound out of Rainbow Cut.

UP5675 WB into Rainbow Cut. Photo by Erik Lindgren.
The line continues to wrap around the peninsula, before reaching the west end of Plain siding. A short stretch of single track leads the main line into the bore of Tunnel 2. This single track stretch between the west end of Plain siding and Tunnel 2 was a notable feature of the area.

Plain siding ends up being very similar in length to the previous siding (143.7" versus 142.4") so the siding remains proportional to those in the layout to this point. In terms of obscuring a turnback curve, I think the large blob at the end of this peninsula works well. Think about the description above. The train rounds the end of Plain siding and wiggles through Rainbow Cut before bending around the hillside further to enter into Tunnel 2. The scenic interruption caused by Rainbow cut effectively makes this two curves, rather than one continuous curve. The slight reverse curve further breaks the turnback curve visually.

The new location of Plain is opposite Arvada in the aisle, but I do not expect Arvada to be as busy of a location as C&S Junction. Chem Spur is now on the opposite side of the peninsula, and I believe that Pinecliffe will be more or less over Leyden. With C&S junction on the opposite side of the first peninsula from Arvada, there should be very limited overlap of the switching areas. Rollinsville may fall over Arvada, but if I can keep the house track further to the bottom of the peninsula, that should not add too much traffic above Arvada.

22 Days to Go. 22 Posts Remaining.

Cameron Turner

Thursday, November 7, 2019

The Turning Point – Part 6: Coal Creek Canyon Revised

The major purpose of the climb from Rocky Siding, through the Big 10 curves, continuing through Clay siding and into Coal Creek Canyon is to transition from the first deck to the second deck of the layout. The question becomes as to whether there is sufficient elevation gain to make this feasible. Concern about the tight vertical clearances and the resulting physical viewability/operability of that section of the layout is at question. Improving the configuration is the necessary goal of this revision to the layout. The original Coal Creek Canyon section of the layout looked like this.

Original Coal Creek Canyon Track Plan.
In the original track plan, there was about 6" between the siding level and the bottom of the upper deck. By the time we get into the turnback loop in Coal Creek Canyon, the bottom of the upper deck is at about 15.5", and the Rocky Flats Branch would be at about 10", providing a gap of 5.5". This is workable, but tight. The space to the mainline is a little better, resulting in a gap of about 11", which is much better.

Revised Track Plan for Coal Creek Canyon.
The revised plan does a little better, but not much. The separation between Rocky Siding and the lower deck is still about 6". but rapidly increases. The Rocky Flats Branch would now be 6" below the bottom of the upper deck with Coal Creek Canyon above. However, the main line is now nearly 13" below the bottom of the benchwork by the time the mainline reaches Tunnel 1. The big difference in the plans is that the grade climbs more from C&S Junction, all the way to Rocky. The grades through the LDEs max out at about 2.2%, and the mainline tends to lie towards the front of the benchwork in the tightest areas. By the Coal Creek Canyon turnback curve, the main line has more than 8" of clearance to the bottom of the upper deck.

I would still like to do better, but as it was before, this is acceptable. With the other improvements to the flow of the layout, the new configuration is definitively better than the original configuration. Other than a slight elevation change, the layout continues through Tunnel 1 as previously designed. The next change comes with Plain siding, which has now been relocated to head towards the bottom of the room. So, we will continue examining the line as we head towards Plain.

23 Days to Go. 23 Posts Remaining.

Cameron Turner

Wednesday, November 6, 2019

Wordless Wednesday

A southern visitor, NS8035 leads a westbound empty coal train up the Big 10 Curves on December 9, 2017. Photo by John Shine.
24 Days, 24 Posts to Go!

Cameron Turner

Tuesday, November 5, 2019

The Turning Point – Part 5: Rocky, the Big 10 and Clay Revised

The original configuration of Rocky Siding, the Big 10 Curves and Clay were close, but not quite satisfactory in the prior plan. These features were placed along the top wall in the original plan, in a configuration like this.

Original Layout Plan for Rocky-Big 10-Clay LDEs.
The new plan is a very similar footprint. However, with the changes in the shape of the peninsulas, the lobe with the Big 10 Curves could be extended, and a small bulge was introduced along the long wall which corresponds to the gap between the two peninsulas in the room. I relocated Rocky a little to the right, and Clay further around the Big 10 curves. This now puts nearly 17 feet of track between the west switch of Rocky and the east switch of Clay, which should be longer than my longest train. So, that problem was solved. This also allowed for a little more elevation to be gained between the two decks. Railhead to railhead clearance is nearly 7 inches, and the upper deck will be located more to the rear of the layout, while I was able to use the bump out to push the lower deck closer to the front. So, even with a relatively narrow perspective on the lower deck, the effect should not be like looking into a deep cave. Generally, I think that the configuration works much better.

Revised Layout Plan for the Rocky-Big 10-Clay LDEs.
I particularly think that the representation of the Big 10 curves is better. Granted, the west switch of Rocky is not in the Little 10 curve as it is properly, and the east switch of Rocky now falls to the east of the Highway 93 bridge, rather than to the west, but I think both are reasonable compromises. I could look at relocating the Highway 93 bridge closer to the entrance to the Rocky Flats helix, but I am not sure I want to do that either at this point. The next question is really how will this new configuration affect the second deck, and is the deck separation really improved? Right now, the point where the junction switch is for the Rocky Flats Branch is at 12.25" above the reference point ( which is Prospect Junction at 0"), and the west switch of Clay is at 19". Considering the deck to deck effective distances will need to be done with the rest of the second deck in place.

25 Days, 25 Posts to go!

Cameron Turner

Monday, November 4, 2019

Revising Barbara Gulch

The original plan for Chem Spur (Chemical) and Barbara Gulch followed a long peninsula that was oriented opposite the peninsula holding Arvada and C&S Junction. Not only would this lead to working conflicts between crews on opposite sides of the aisle, but this aisle way was also further constricted by the presence of a support post in the aisle.

Original Barbara Gulch Plan.

The revised plan for the area is designed around a peninsula that comes off the right wall, and bends towards the lower end of the room. This adds additional convolutions to the trackage through the gulch and allows for generally better aisles around the area. The new plan can be seen below.

New plan for Barbara Gulch.
In this plan, the primary switching area in the gulch, Chem Spur or Chemical, is located on the Leyden side of the peninsula. This provides its own area for switching to occur. And the aisles in the area are generous, with a minimum of 36" between the peninsulas.  Larger areas are available at the stub end of the aisle 42.5". On the other side of the peninsula, the aisles are less generous, with a minimum of 29.25" at the location of the support post, but 30"+ on either side. The only significant switching in this area is due to the presence of Arvada, and with wider spots nearby, I think that any crew meets can be managed.

As with the other modifications, this looks pretty good, although I was not able to do much with the narrow space for the Indiana Street bridge (just west of Leyden) where the backdrop for the Rocky branch narrows the available benchwork.  One option is to narrow the aisle here, and bring the track forward in the scene. I may still consider this, but I think that the scene may work in this format. Since the track in the region is running on an embankment, the narrow scene would simply be the long fill on which the railroad is built with a backdrop close behind. It actually may work better scenically to keep this region narrow.

So, like the others before it, I am happier with the resulting changes. And this finally leads us to the next stop, the transition between deck 1 and deck 2 at the Big 10 Curves.

26 Days, 26 Posts to Go.

Cameron Turner


Sunday, November 3, 2019

Revising Arvada

The original track plan for Arvada lacked much detail but was also very compressed by the need for a 180 degree turnback curve on the inside of the peninsula. While I never detailed any of the sidings in the area, the configuration was going to be problematic.

Original Arvada Track Plan.

The new version of Arvada is much more linear. Emerging from the Belina Drop, there are a couple of sidings before the mainline crosses Wadsworth Boulevard. Here, I did modify the bridge type to get a more interesting bridge than the concrete viaduct, but the bridge is actually more reminiscent of the light rail bridge over 6th Avenue installed years later. The main line also takes a little more inspiration from the route of the Golden Branch through Arvada, but since I am not modeling that part of the Golden branch, I am okay with shifting the scene a couple of blocks to the north where the D&RGW line runs. Once through downtown Arvada, the line enters a more residential area on the way to Leyden.


Revised Arvada Track Plan.

Here again, the increased linearity of the new design works well. The Belina Drop hides the single 180 degree turn from view, the remaining visible curves do not form full turnback curves and are paired with other subtle complementary curves, which should further straighten the apparent direction of the line.

Complementary Curves in Arvada Area.

Again, I feel that this plan has a lot going for it. It is clearly an improvement over the prior layout plans.

Leyden did not need modifications, so the next area to revisit is Barbara Gulch. So, that is where we will go next.

27 Days, 27 Posts to Go.

Cameron Turner


Saturday, November 2, 2019

Revising C&S Junction

With a new benchwork configuration in place, I needed to rework the track plan for the new benchwork. For reference, the original benchwork and track plan looked like this.

The Original C&S Junction Plan.

Since this point, I have been able to add some additional details to the track plan, including roads, bridges and buildings. These details were added after I confirmed that the track plan seemed to fit my needs, but I have included them in the images here. I'll explain my process for working in these details in a future post. However, here is the new track plan.

Revised C&S Junction Track Plan.

This configuration gives me some nice new possibilities. The turnback at the left end of the original plan is muted, now being about 120 degrees, instead of a full 180 degrees. Add in the reverse curve, and it helps diminish the feeling that the tracks are looping back on themselves. Furthermore, at the top end of the peninsula, I execute a "Belina drop" where the backdrop will climb up to the upper deck, preventing the engineers from observing the full 180 degree turnback curve. This also minimizes the challenges of the narrow layout section necessitated by the backdrop wrapping around the outside of the Golden Branch helix.

All in all, the new C&S Junction is a better configuration for the layout. The necessary changes to accommodate the new benchwork configuration work well. Finally, the switching near C&S junction is now in its own location, without any other significant switching nearby. Therefore, crews working this area should not affect other crews passing through as much as they would if there was another switching operation in the same aisle area.

28 Days, 28 posts to go.

Cameron Turner

Friday, November 1, 2019

Welcome to Model Railroading Month

November is National Model Railroading Month! Welcome aboard. I'd actually hoped to post one more time before October was finished, but I did not quite make it. I have noticed that I have been able to post fairly regularly since my blog reboot in June. I managed 11 posts in July, August, September and October, and my 3 posts in June - if projected out to the full month would be 11. So, I'm going to set an ambitious goal for November in honor of National Model Railroading Month.

30 Days -- 30 Posts!

Yep, 1 post per day for the month. So, let's get started by returning to the Moffat! It has been more than a month since I indicated that I was going to rework the plan. If you have forgotten, you can check in on that last post here. In the post, I pointed to several flaws that were bothering me about my initial track plan. So, I started trying to address those issues.


Original Configuration

The challenges I previously identified included the following:

  1. Plain, Cliff and Rollins are all mashed into the same aisle space. And if we include the first deck, we would find Chem Spur and C&S Junction are also stuck there. Already a narrow aisle, this seems destined to get plugged up with operators. 
  2. The helix intended to connect to the Rocky Flats branch is also a potential problem. Where it loops around by Leyden, the branch line is actually well above the height of Leyden, yet there is not a lot of space there between the tracks. The result appears to be a near vertical backdrop between the tracks. Further, the radius of the helix is less than I would like it to be which also drives up the grade.
  3. Furthermore, looking at deck 2, Tunnel 2 is going to fall at the curve leading along the wall. Exiting Tunnel 2 is Bull Gulch, a sweeping curve viewed from the inside, between Tunnels 2 and 3. This feature is going to be difficult to model.
  4. In addition, the flatirons would be on the opposite side of a narrow aisle from the scenery of the middle tunnel district (Tunnels 10-18), which when I picture it, is mentally jarring.
  5. Finally, I am a little concerned as to whether there is sufficient distance for the middle tunnel district to conclude before I need to reach Crescent opposite the door. And that position is needed to allow for Tunnels 19-23 to occur to place Tunnel 23 in front of the electrical boxes. 
So, my goal became to try to unfold the peninsulas, and in so doing, I tried to achieve the configuration down below. This straightens out several of the peninsulas, eliminating some of the tighter turnback curves and creating a void for the space where Arvada, Plain, Cliff and Rollins would all end up. This looked promising, but it also placed Plain over Leyden (since Coal Creek Canyon would need to be in the 180 turnback at the end of Barbara Gulch, and this in turn places Tunnels 2-8 over Arvada. This just doesn't give me enough room to get from Tunnel 10 to Tunnel 19 before I get back to the doorway.

Possible new configuration.
 So, I tried again. This time I flipped the Leyden peninsula around to connect to the top wall of the room next to Rocky. This led to this configuration.

Third Configuration
 This configuration seems to work in some ways better, by placing the blob in the second peninsula in the open area created by angling the first peninsula. However, Plain siding is still further along the second deck than I would like, and the location of the Coal Creek Canyon turnback loop would be awkwardly located in the upper right hand corner. Further, Rocky gets cramped significantly by the second peninsula. Again, I wasn't satisfied. So, I tried again by stubbing off the second peninsula coming off the right hand wall. That led to this plan.


Fourth Configuration (First Deck in Black - Second Deck in Red)
The fourth configuration appears to be the most promising. This configuration also led to another set of changes. Since the door to the garage is being used for the layout, I explored the idea of locating a second door (without a layout going through the opening) to a location a few feet below the existing doorway. This change should be feasible. It also allowed me to change the construction of the wall dividing the garage and layout room into a straight wall, allowing me to find a space to locate a possible Coors Brewery Branch. I'll discuss that addition in a future blog.

The new configuration leads to a lot less congestion from deck to deck. I wasn't able to do as much with the Rocky Flats Helix, but I think I can manage it as is. Worst case, I do not have the branch. Tunnel 2 now falls in a turnback location, which is much better for Bull Creek Gulch. The first and second parts of the Tunnel district are now more separated. And finally, the new wiggles in the first helix seem to add a little more length to the run to Crescent. If I also shift Rocky towards Leyden a little bit, and Clay towards Coal Creek Canyon, I think I can get a better spacing through the Big 10 curves as well.

So, we have a configuration. Now, to update the plan.

29 Days, 29 Posts to go.

Cameron Turner