Design is an iterative process, and sometimes the iterations are big. In the last several posts, I have repeatedly made comments that
"the design is okay but..." At some point, those compromises add up, and so in the last week or so, I have begun wondering if I need to make some adjustments to the layout. Let's revisit some of the issues that have been worrying me.
- Previously, I worried a bit about the height difference between the track at Rocky and the track above it passing through Blue Mountain Crossing. The clearance from the track to the bottom of the upper deck is about 6 inches, which once mocked up, appears feasible albeit not perhaps ideal.
- Similarly, I worried about the lack of distance between the west end of Rocky siding and the east end of Clay siding.
- I also expressed some concern with the length of the siding at Plain, wondering if it could be a bit longer.
- Finally, I continue to be bothered by the support post near Plain, wondering if I could find a better bench work configuration to make the location of this post less obnoxious.
One issue that I have not previously discussed, but has come up, is with how the track will meander through the second deck and even on a third deck. Let me explain.
 |
| Concept for the trackage on Deck 2. |
My design concept after leaving Plain is to enter the Tunnel District with Tunnels 2-8. These tunnels are the ones that run along and through the flatiron formations, such as those in the view below.
At Tunnel 8, the railroad swings into South Boulder Canyon, and upon exiting Tunnel 8, begins to transverse another distinct region of the Tunnel District. With Tunnels 10-18 (recall that Tunnel 9 has been daylighted, the scenery changes character. My goal here is to gain sufficient elevation in this climb back around the peninsulas so that when I reach the doorway, I can arc the mainline along to the wall in a 180 degree curve with a nod-under and enter the siding of Crescent. Leaving Crescent siding, the terrain again changes, and I hope to use the length of Tunnel 23 to create a narrow removable section that would pass in front of the electrical boxes and reach a third deck above the Big 10.
 |
| Concept for the trackage on Deck 3. |
On the third deck, the climb continues, with Tunnels 23-27 and Tunnel 29 finishing the climb into the siding at Cliff. Leaving Cliff, we encounter lonely Tunnel 30, and then the sidings of Rollins, Tolland and East Portal before reaching the Moffat Tunnel. While I could end the line at the summit, I dearly like the idea of representing Winter Park and at least Tabernash, critical towns on the western side of the Moffat Tunnel for the operation of the Ski Train. The Ski Train stops in Winter Park (while Amtrak stops in Fraser and then Granby - towns before and after Tabernash) and the Ski Train equipment is turned at Tabernash and either waits there or in Fraser until its afternoon departure. So, while I see little hope of reaching Bond with its crew change point, Tabernash seems achievable.
- But looking at these plans, another set of issues appears to be pressing. Plain, Cliff and Rollins are all mashed into the same aisle space. And if we include the first deck, we would find Chem Spur and C&S Junction are also stuck there. Already a narrow aisle, this seems destined to get plugged up with operators.
- The helix intended to connect to the Rocky Flats branch is also a potential problem. Where it loops around by Leyden, the branch line is actually well above the height of Leyden, yet there is not a lot of space there between the tracks. The result appears to be a near vertical backdrop between the tracks. Further, the radius of the helix is less than I would like it to be which also drives up the grade.
- Furthermore, looking at deck 2, Tunnel 2 is going to fall at the curve leading along the wall. Exiting Tunnel 2 is Bull Gulch, a sweeping curve viewed from the inside, between Tunnels 2 and 3. This feature is going to be difficult to model.
- In addition, the flatirons would be on the opposite side of a narrow aisle from the scenery of the middle tunnel district (Tunnels 10-18), which when I picture it, is mentally jarring.
- Finally, I am a little concerned as to whether there is sufficient distance for the middle tunnel district to conclude before I need to reach Crescent opposite the door. And that position is needed to allow for Tunnels 19-23 to occur to place Tunnel 23 in front of the electrical boxes.
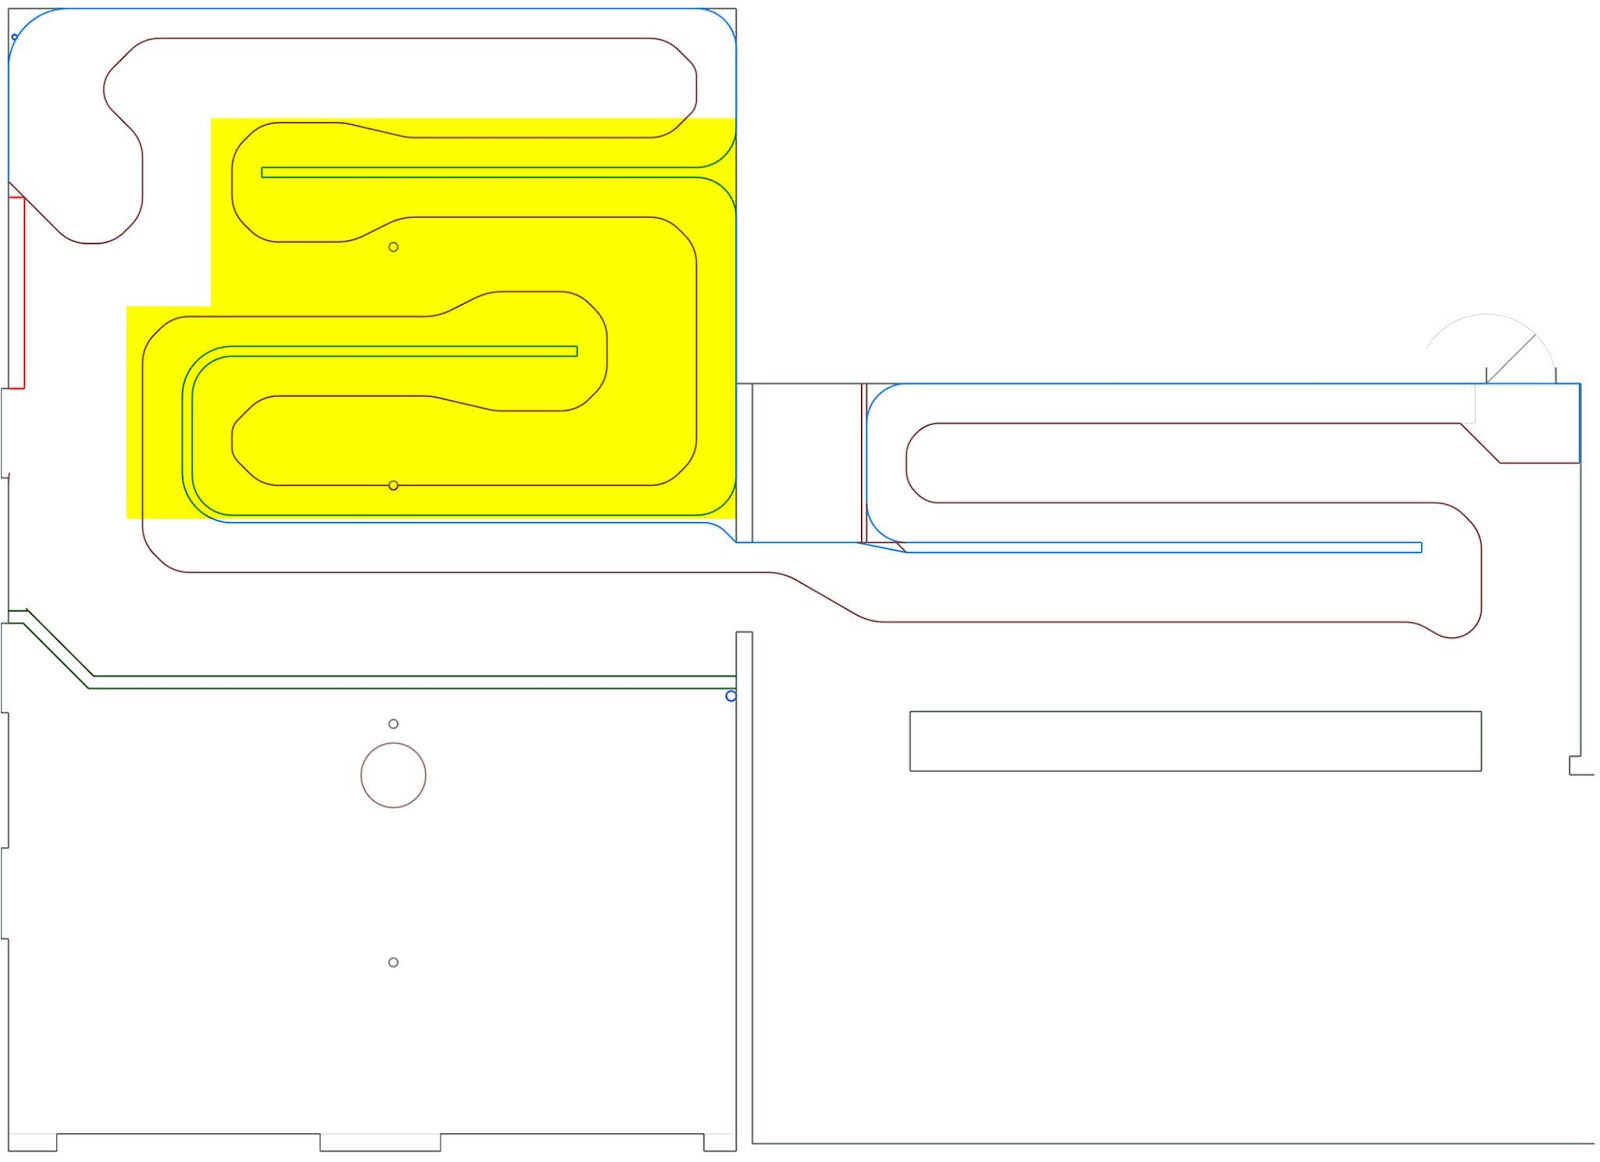
In short, I have become convinced that there are elements of the benchwork configuration that are not working well in this plan. So, I have decided to revisit the benchwork configuration for a portion of the plan as shown below.
 |
| I plan to try to reconfigure the benchwork in the highlighted areas. |
Time to iterate on the design. The nice part about drawing these plans up using a computer-aided design (CAD) system is that you can save files and iterate. So, I can leave the plan where I am at, and play with some alternatives. If none of the alternatives seem to work out better, I can go back and continue with the plan as it is currently defined. Or, if I find another solution worth pursuing, I can go from there. So, I'm going to work generating some alternatives to the problems above so that I can continue to go
Thru the Rockies and Not Around Them in 1:160!
Cameron Turner


No comments:
Post a Comment