Sunday, November 17, 2019

Tunnels 17 and 18

The last two tunnels of the Middle Region of the Tunnel District are Tunnels 17 and 18. Tunnel 17 is the longest tunnel on the district, save the Moffat Tunnel at the summit. At 1730 feet in length, Tunnel 17 bores through a major ridge descending from Scar Top Mountain. To the West of this ridge lies Johnson Gulch, which drains a number of natural springs in the area. Due to the springs, water is often heard at the west portal of Tunnel 17.

Approach to Tunnel 17. Photo from Rio Grande Secret Places, Volume 1 by R.C. Farewell.
East Portal of Tunnel 17. Photo from Rio Grande Secret Places, Volume 1 by R.C. Farewell.

To the east of Tunnel 17 was a spur named Quartz. The spur was removed by 1949, but up to that point, it was a source for some mineral shipments from the area. Should I decide to employ a little modelers license, I could include this spur at this location. At a minimum, I will need to allow for space for an abandoned spur in the area.

Tunnel 18 by contrast is a short tunnel with a length of 238 feet. It penetrates a shallow ridge coming off the northern side of Scar Top Mountain, and very easily could have been daylighted, but never has been. Tunnel 18 represents the western end of the Middle Region of the Tunnel District.

SP124 heads west out of Tunnel 18. Photo from Rio Grande Secret Places, Volume 1 by R.C. Farewell.
The space for the modeled representation of this area is physically located above the Cargill area just past North Yard. That part of the layout is at an elevation of 2.5" above the reference elevation while the mainline at west end of Tunnel 18 reaches 38" above the reference elevation. The elevation climb is an amazing accomplishment.

Track Plan for Tunnels 17-18 in relation to Tunnels 7, 8 and 10.
Tunnel 17 helps achieve its length (83.2") by using the same trick of penetrating the the backdrop (previously used in Tunnels 8 and 10). However, in this case, the track of Tunnel 17 will be hidden in the mountainside above the track between Tunnels 8 and 10. At that point the elevation difference is about 5.5", so it should be easy to hide into the hillside. Tunnel 17 as modeled is a little shorter than Tunnel 10, but I may be able to address that discrepancy by moving the east portal of Tunnel 10 a few inches.

Beyond Tunnel 17, the hillsides become a bit more open and rolling as we approach Crescent Siding. Tunnel 18 is represented with a 16.5" long tunnel through the rolling ridge. Before leaving the garage, the main swings around to cross the doorway. With a mainline elevation of 38", I expect to be able to achieve a nod under crossing of the doorway with a lower edge of the benchwork at about 36" above the reference height. Since the reference elevation is likely to be around 30"-32", this places the nod under at about 66"-68", which should be fairly comfortable for many users.

13 Days, 13 Posts to Go.

Cameron Turner

Saturday, November 16, 2019

Into the South Draw and Tunnel 16


Tunnel 15 leads the main line into the South Draw, a valley between Eldorado Mountain, Crescent Mountain and Scar Top Mountain. In the South Draw, the main line makes a 180 degree horseshoe curve as part of the climb, including a penetration through Tunnel 16.

Satellite View of the South Draw Area.
Tunnel 16 is 698 feel long, and serves as a portion of the 180 degree curve. Upon exiting Tunnel 16, the main continues out of the South Draw, through the site of Old Tunnel 17. Old Tunnel 17 never was a tunnel. It started as a tunnel, but the rock proved to be too unstable and the tunnel collapsed during construction. The attempted tunnel was eventually removed, and the remains became a wide spot in the roadbed and a cut into the hillside of Scar Top Mountain. From there, the line continues around the ridge and back into South Boulder Canyon.

Looking across the South Draw towards the site of Old Tunnel 17. Photo from Rio Grande Secret Places, Volume 1 by R.C. Farewell.

Approach to the East Portal of Tunnel 16. Photo from Rio Grande Secret Places, Volume 1 by R.C. Farewell.

Track Plan for the South Draw and Tunnel 16.

The layout plan for the South Draw and Tunnel 16 is a compromise of the prototype region versus the benchwork. While I was able to include part of the 180 degree curve, I had to reverse the curve in Tunnel 16. The result is less of a 180 degree horseshoe curve, and more of a dip into the South Draw gap and then an extended run up the draw. Tunnel 16 is represented with a 39.9" tunnel, and Old Tunnel 17 is also represented. Interestingly, its location falls near the track to Tunnel 10. At this point, the main line is about 35-3/8" (above the zero elevation) at Old Tunnel 17 and at 32" within Tunnel 10. Like the prototype, the main curves sharply around the end of the ridge coming off Scar Top Mountain and heads towards Tunnel 17.

14 Days, 14 Posts to Go.

Cameron Turner

Friday, November 15, 2019

Tunnels 11, 12, 13, 14 and 15

Beyond Tunnel 10, the Moffat continues its climb up South Boulder Creek Canyon by cutting through numerous ridge lines that run down into the canyon. The first of these tunnels is Tunnel 11, a 230 foot tunnel piecing a rocky ridge on the northwestern side of Eldorado Mountain.

DRGW5389 heads east out of Tunnel 11 in 1992. Photo from Rio Grande Secret Places, Volume 1 by R.C. Farewell.
Amtrak Number 5, the Westbound California Zephyr exits the other side of the ridge through Tunnel 11 in 1995. Photo from Rio Grande Secret Places, Volume 1 by R.C. Farewell.

After a few hundred feet, the mainline encounters another ridge of Eldorado Mountain, and penetrates it with the curving 429 foot Tunnel 12. While the eastern slope is very steep and rocky  like Tunnel 11, the western side of the ridge is much more rounded.

Just West of Tunnel 12, and Eastbound coal train is about to enter Tunnel 12. Photo from Rio Grande Secret Places, Volume 1 by R.C. Farewell.
Tunnel 13 penetrates yet another ridge off the western side of Eldorado Mounatin. Tunnel 13 lies to the west of a long curved fill and to the east is another curved fill leading to Tunnel 14. The combination of curves and grade pose a significant test to trains climbing through the Tunnel District. Crews report that trains that successfully make it through to Tunnel 14 are usually successful for the rest of the climb.

DRGW5369 heads west out of Tunnel 14's western portal. Photo from Rio Grande Secret Places, Volume 1 by R.C. Farewell.
Tunnel 14, like Tunnel 13 has two faces. The eastern face is steep, and rocky, while the western side is rounded, covered with grass and trees. Tunnel 15 penetrates the last ridge running from Eldorado Mountain, and brings the main line into the South Draw. The bore of Tunnel 15 is 427 feet long. To the west of Tunnel 15, there was a deep drop into the depths of the South Draw drainage. This trestle location was filled in using materials from Tunnel 9, and the original Tunnel 17, leaving a long fill.

Western portal of Tunnel 15 with DRGW3015 emerging with a westbound into the South Draw.
The plan for this stretch of tunnels wraps around the first peninsula of the layout over Arvada and C&S Junction. Because of the Belina drop hiding the end of the peninsula on the lower level, the end of the peninsula on the second deck appears all on its own, with no lower deck to fight for attention.

Track Plan for Tunnels 11-15.
Again, the tunnels are proportional in length and spacing. Tunnel 11 is 16.5" long, Tunnel 12 is 36.5" long, Tunnel 13 is 20.6" long, Tunnel 14 is 27.4" long and Tunnel 15 is 22.5" long. From the west portal of Tunnel 10, to the East portal of Tunnel 16, the main line is just over 20' long, and climbs from 32.5" to 35" (above the zero reference point). Most of the climb lies between Tunnel 12 and Tunnel 14, where the grade reaches 1.5%, while navigating the 18" radius curve between Tunnels 13 and 14. This curve mimics the tight curve on the fill found tot he west of Tunnel 13 in the prototype and should test trains just like this stretch of track does in the prototype. However, there is still some grade between these points.

One modification to be made to this plan is to replace the tangent track between Tunnel 12 and 13 with a curved track as in the prototype. While I am not sure I can achieve the reverse curve seen in the prototype and still work around the end of the peninsula, I am sure I can add curvature here to mimic the prototype.

Beyond Tunnel 15, the tracks enter a bowl called the South Draw, where the train curves around and through Tunnel 16 as it continues up the canyon and through 3 more tunnels before finally reaching the siding of Crescent and the first real break in the climb since Plain siding. At this point, Plain siding is nearly 2 scale miles behind and 8.5" below the current main line elevation. Crescent is almost another scale mile ahead with another 3" to climb. Now that is a helper grade between two sidings that will feel like traveling somewhere.

15 Days, 15 Posts to Go.

Cameron Turner

Thursday, November 14, 2019

Tunnel 10 – Wait what about Tunnel 9???

The next tunnel after Tunnel 8 is Tunnel 10 as we continue up the Middle Region of the Tunnel District. The observant might be wondering what happened to Tunnel 9. There was a Tunnel 9, briefly. The tunnel was about 120 feet long, through a spur off Eldorado Mountain, but was unstable from the beginning. A tight radius shoo-fly was built around the tunnel, and remained until 1938 when the tunnel and unstable spur were removed for the present alignment. I plan to model the remaining wide spot of the shoo-fly, but no tunnel.

The original tunnel 9 cut through the ridge in the picture above. Photo from Rio Grande Secret Places, Volume 1 by R.C. Farewell.
So, the next tunnel on the line is Tunnel 10. Tunnel 10 is a large tunnel at 1572' in length. In 1943, the tunnel caught fire and had to be sealed to extinguish the fire. The tunnel is linear, but I modeled it with a long curve to turn the corner of the benchwork. The two tunnel portals are about 600 scale feet apart, but the train travels over 7 feet between portals. Some trains will completely disappear into the tunnel, although not for long. Again, I use the track piecing through the backdrop but remaining below the scenery on the far side of the layout to achieve this distance.

Tunnel 10 cuts through a major ridge line reaching into South Boulder Canyon. Photo from Rio Grande Secret Places, Volume 1 by R.C. Farewell.
The long spacing between the portals affords me the opportunity for a large area of nothing but scenery. While this may seem like a disadvantage, I am looking at it as a significant opportunity to gain the illusion of distance. Tunnel 10 pierces the first of several ridge lines as the main line climbs up the canyon. even scaled down, this ridge line will further emphasize the magnitude of the scenery in the area.

Tunnel 10 LDE Plan.
Tunnel 10 ends up with a modeled length of 86.9". The grade, which paused at the start of Tunnel 8, resumes with the visible track emerging from Tunnel 8. This helps prevent the mainline from climbing too much as it works its way back around the room and gaining too much elevation for the upper deck. By the time the track emerges from the west portal of Tunnel 10, it has climbed to 32.5" above the reference point (Prospect Junction) and 1.5" in its climb through the Middle Region of the Tunnel District.

16 Days, 16 Posts to Go.

Cameron Turner

Wednesday, November 13, 2019

Wordless Wednesday

July 2014, a westbound BNSF train with a BNSF warbonnet, a CSX and a former Soo engine head past Blue Mountain crossing. Photo by John Shine.

17 Days to go. 17 Posts to go!

Cameron Turner

Tuesday, November 12, 2019

Tunnel 8

Tunnel 8 is the end of the Flatirons Region of the Tunnel District and the start of the Middle Region of the Tunnel District. As such, Tunnel 8 is a critical point of demarcation between the two regions in the Tunnel District.

The prototype Tunnel 8 penetrates beneath the peak of Eldorado Mountain to swing from a generally northerly direction to head west up South Boulder Canyon.

Satellite View of the Tunnel 8 Area.
The track swings to the right as it goes into Tunnel 8, and continues to the right as it plunges through the tunnel. This gives ample opportunity to use the hidden track to reorient the track to follow the benchwork.

The view of the east portal of Tunnel 8 at the west end of the Flatirons Region of the Tunnel District. Photo from Rio Grande Secret Places, Volume 1 by R.C. Farewell.

Further, since Tunnel 8 marks a change in scenery, it makes sense to physically separate the Flatirons Region scenes from those in the Middle Region. Tunnel 8 is the longest tunnel yet at 753 feet. This led to the track plan below.

Track Plan for Tunnel 8.

In the plan, Tunnel 8 begins with a curve to the right just as in the prototype. However, this turn pushes the track through the backdrop dividing the two sides of the benchwork. In turn, this leads to a reverse curve that extends the length of the tunnel so as to bring the tunnel back to the viewable side of the benchwork. This trick should work as the trackwork in Tunnel 8 will be below the scenery level on the opposite side of the benchwork. With some care, I should be able to make sure that the track is accessible. The overall tunnel length is a little long, at 69.1", but the portal to portal distance is about 59" which is closer to the prototype tunnel length of 44". However, given the location of the support post, and the desire to separate the scenes, the tunnel length works to minimize the impact of the support post on the west portal of Tunnel 8 scene.

The west portal of Tunnel 8 in the Middle Region of the Tunnel District. Photo from Rio Grande Secret Places, Volume 1 by R.C. Farewell.
The exit from the west portal of Tunnel 8 has very little curvature to it. The plan requires a little more curvature than the prototype, but not so much as to be unacceptable. While Tunnel 8 is a long tunnel at almost 6 feet in length, many of the trains I expect to run on the layout will be in the range of 7 to 15 feet, and thus trains should be visible despite the length of the tunnel. By the time the main line reaches Tunnel 8, the track elevation has reached 31 inches above the reference elevation. The deck separation at this point is ranges from about 16 inches at the low spots in the scenery, to approximately 24 inches at track level of greater. Furthermore, the flatirons occupy their own distinct area on the layout with a clear scenic demarcation to the middle region. I believe that this plan continues to work well.


18 Days to go. 18 Posts to go!

Cameron Turner

Monday, November 11, 2019

Tunnels 6 and 7

The Flatiron Region of the Tunnel District continues through Tunnels 6 and 7. Tunnel 6 is dwarfed by the massive slab of rock through which it is bored. Tunnel 6 is slightly shorter than Tunnel 5 at 32.8" but by placing it in the corner of the benchwork, it allows me to hide the turn to the right.

Track Plan for Tunnels 6 and 7.
East Portal of Tunnel 6. Photo from Rio Grande Secret Places, Volume 1 by R.C. Farewell.

As in the prototype, the entrance to Tunnel 6 is a curve to the right, so the plan captures the essence of the tunnel as well. Tunnel 7 on the other hand is a straight shot as can be seen below.

Tunnel 7 lies on a tangent stretch of track. Photo from Rio Grande Secret Places, Volume 1 by R.C. Farewell.
This too is captured in the track plan. A similar photograph should be achievable in the layout. Tunnel 7 is short, only 14.8" long, but again, all the tunnel lengths and the distances between the tunnels are proportional to the prototype.

The east portal of Tunnel 8 represents the end of the Flatirons Region of the Tunnel District. The west portal lies in the South Boulder Creek drainage as part of the Middle Region of the Tunnel District. That will be our next stop.

19 Days to go. 19 Posts to go!

Cameron Turner


Sunday, November 10, 2019

A Momentary Aside - A little HOn2z Progress

Sometimes, even the best plans go amiss. Yesterday, was the NMRA Palmetto Division of the NMRA fall meeting. I had planned on going, but a combination of a tweeked back and not feeling particularly well led me to pass on the meeting.

One of my goals, going back even before my surgery has been to earn my Master Model Railroader (MMR) certification. Not because I feel the need to demonstrate my skills, but as a means of improving them. While I primarily model in N-scale, I dabble in Z, T and in HOn2z (2' gauge, HO scale using Z-scale track). And I cannot confirm or deny the presence of some On30 in my basement either. But it is the HOn2z that I am taking an aside to discuss today.

I had been thinking about bringing my HOn2z projects tot he meeting to show, but alas, I do not have things at a point where I want to show them yet. Most are incomplete, but I thought I might preview a couple of pictures.

Gilpin Gold Tram Ore Car.
 Most of my efforts are focused towards the Gilpin Gold Tram, a 2' gauge line that ran out of Central City and Blackhawk, Colorado.  Despite being HO scale, the cars are similar in size to N-scale cars, and they ride on Z-scale trucks and track. The cars are all being 3D printed and then I am assembling them and finishing them. The ore car above has just had the two cross bars that connected to the chains the connected to the doors of the ore car. There is still some work to be done, but the car is making progress.

Gilpin Rail Car.
The latest car to get started is this Gilpin rail car. Basically an open frame used to move sections of rail and steam boilers along the line, I printed this car primarily in brass to get sufficient weight on the car.

More of the fleet.
And the rest of the fleet. There is a water car (upper left), a stake bed flat car (left), 2 more typed of ore cars (middle), a gondola (upper right) and several flat car frames are all under construction. It is nice to have something to do when I do not want to work on planning, and maybe this will even lead to yet another little layout project. Stay tuned!


20 days to go. 20 Posts to go!

Cameron Turner

Saturday, November 9, 2019

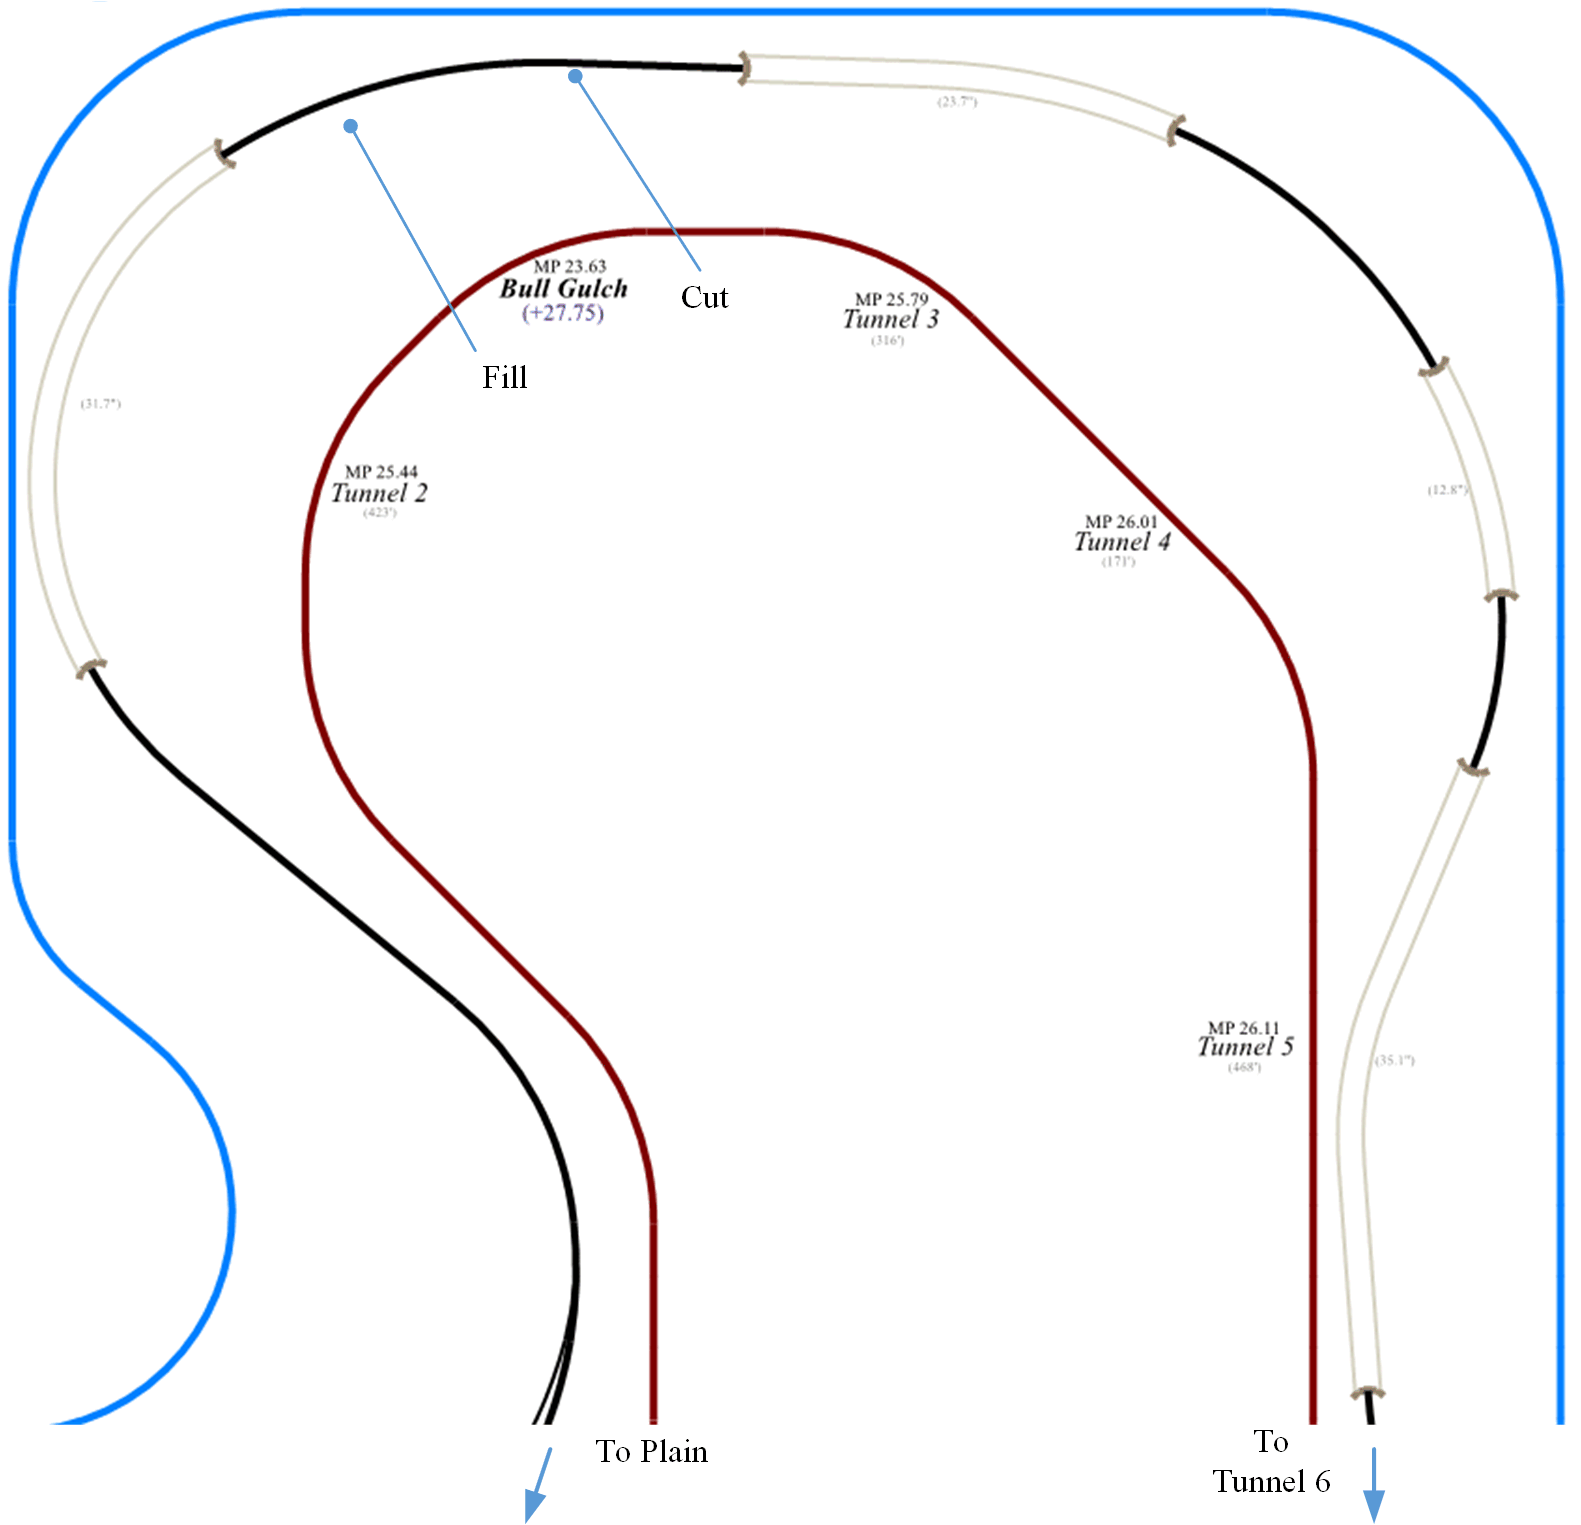
Tunnels 2, 3, 4, and 5

Finally, we get back to new trackage. I'm pretty happy with the potential of the new benchwork configuration, so the plans from here on out, use that configuration as their basis.

Just to the west of Plain siding, we hit the Flatirons portion of the Tunnel District. The Tunnel District itself contains 28 tunnels in 17.1 miles. Tunnels 2 to 29 includes 26 tunnels in about 10 miles, which is one of the highest concentrations of tunnels in America.

Two tunnels are now defunct, Tunnels 9 and 28, and the two tunnels at either end of the tunnel district, Tunnel 1 and Tunnel 30 are both isolated from the rest of the district. The rest of the Tunnel District can be divided into three regions. The first region is Tunnels 2-8, which comprise what I call the Flatirons Region of the Tunnel District. Tunnel 8 is the dividing line between the Flatirons Region and what I call the Middle Region, which extends to Tunnel 18 and Crescent Siding. The Middle Region lies along South Boulder Creek, although for the entire run through this region, the creek lies a considerable distance away from and below the railroad. Beyond Crescent Siding, the Upper Region of the Tunnel District, Tunnels 19-27 and Tunnel 29, lie much closer to South Boulder Creek and even run along the creek itself.

Tunnels 2, 3 and 4 in the Flatiron Region of the Tunnel District. Photo from Chuck Conway's Heart of the Rockies.
This scene has been similarly captured by Mike Danneman in his layout.

Tunnels 2, 3 and 4 on Mike Danneman's Layout.
Physically, there is a short separation of single track between Plain siding and Tunnel 2. I wanted to capture that in the plan. Immediately after Tunnel 2, the line sweeps across Bull Gulch on a massive fill. Bull Gulch washed out in October 2013.

DRGW 5390 climbs WB out of Tunnel 2 and across the fill at Bull Gulch. Photo from Chuck Conway's Heart of the Rockies.
Bull Gulch Washout, October 2013 from Below.
Bull Gulch Washout, October 2013 from Above.
After crossing the fill across Bull Gulch, there is a cut through a protruding flatiron slab and then the line enters into Tunnel 3.

East portal of Tunnel 3 with DRGW 3123 and 3156 headed westbound in 1991. Photo from Rio Grande Secret Places, Volume 1 by R.C. Farewell.
Tunnel 3 is often described as a slot through the Flatirons.Tunnel 4 is quite similar, but the west portal emerges from a substantial flatiron formation that leaves much of that portal in shadow. Photos are difficult to come by but some do exist.

West portal of Tunnel 4 with SP9731 leading a passenger special west. Photo from Rio Grande Secret Places, Volume 1 by R.C. Farewell.

East Portal of Tunnel 5 presents another penetration of the iconic Flatirons southwest of Boulder, Colorado. Photo from Rio Grande Secret Places, Volume 1 by R.C. Farewell.
So, with all of these iconic images through the Flatirons in mind, I have put together the following track plan that brings the mainline off the second peninsula and along the wall above Leyden Siding.

Track Plan for Tunnels 2-5 through the Flatirons.

So, in this plan, I have a short section of single track between the west end of Plain, and the east portal of Tunnel 2. Tunnel 2 with a length of 31.7", bends around the corner, and the curve continues across the fill of Bull Gulch (over a 33" radius). The mainline cuts through a slab of the flatiron formation, and then the main plunges into Tunnel 3 for another 23.7". These both seem to be long tunnels, but both are proportional to the actual tunnel lengths, as it the spacing between them. Those proportions are continued throughout the Tunnel District. After another brief appearance, the line enters Tunnel 4 for 12.8", appears again along a 21" radius curve (instead of a tangent as in the prototype) before plunging into Tunnel 5 for the next 35.1". Most trains will be continuously playing peek-a-boo during the transit through this part of the layout.

In the plan, I show the tunnel portals, and the width of the tunnel itself. I've hidden the track centerline itself in the plan above. The train continues its climb from Plain (at 26.5") to the west portal of Tunnel 5 (at 29.3"). The entire scene is 17' long, and the resulting grade is about 1.3% which should be enough to be noticeable, but should not be a severe operational impediment. The ruling grade remains out in the open through the Big 10 curves. I think that the scene will be both impressive and immersive in its effect. I am excited about seeing it in reality.


21 Days to Go. 21 Posts Remaining.

Cameron Turner

Friday, November 8, 2019

Re-Viewing Plain

I had previously arrived at the siding of Plain on the earlier plan. However, once I realized that the location of Plain would be directly above the Chem Spur area on Deck 1, and right behind Plain on the opposite side of the aisle would be C&S Junction on the lower deck, and Pinecliffe would be directly above Plain. In addition, the support post in the area complicates the aisle size. In short, I could envision that there was going to be a problem in that aisle.

Original Plain Siding Track Plan.
The reconfigured benchwork footprint, places Plain in a different configuration on a shorter peninsula. To maintain the relative length of Plain siding, the siding will need to be a lot less linear. This is not all bad. Plain is fairly linear on the east end, but the west end does curve around a bit as the line approaches Tunnel 2. With the new benchwork configuration, I was able to arrive at this track configuration.

Revised Plain LDE.
The resulting plan for Plain siding is fairly linear on the east end (near Tunnel 1), but not quite as much as is the prototype. Still, it is fairly reasonable.

WB Train at the east end of Plain siding.
Towards the bottom left hand corner of the plan, the siding will bend around to penetrate Rainbow Cut, a very colorful rock cut in the area. This curve is a bit more extreme than the real location, but again, it is necessary and an acceptable compromise.

DRGW5390 Eastbound out of Rainbow Cut.

UP5675 WB into Rainbow Cut. Photo by Erik Lindgren.
The line continues to wrap around the peninsula, before reaching the west end of Plain siding. A short stretch of single track leads the main line into the bore of Tunnel 2. This single track stretch between the west end of Plain siding and Tunnel 2 was a notable feature of the area.

Plain siding ends up being very similar in length to the previous siding (143.7" versus 142.4") so the siding remains proportional to those in the layout to this point. In terms of obscuring a turnback curve, I think the large blob at the end of this peninsula works well. Think about the description above. The train rounds the end of Plain siding and wiggles through Rainbow Cut before bending around the hillside further to enter into Tunnel 2. The scenic interruption caused by Rainbow cut effectively makes this two curves, rather than one continuous curve. The slight reverse curve further breaks the turnback curve visually.

The new location of Plain is opposite Arvada in the aisle, but I do not expect Arvada to be as busy of a location as C&S Junction. Chem Spur is now on the opposite side of the peninsula, and I believe that Pinecliffe will be more or less over Leyden. With C&S junction on the opposite side of the first peninsula from Arvada, there should be very limited overlap of the switching areas. Rollinsville may fall over Arvada, but if I can keep the house track further to the bottom of the peninsula, that should not add too much traffic above Arvada.

22 Days to Go. 22 Posts Remaining.

Cameron Turner